Write a post: the social post composer
17 views · by Kevin J Bruno · updated 3 days ago
The Write a post page is the composer for the firm's social posts. You write the text once, choose which of the firm's pages it goes to, and optionally give each network its own wording, a project the post is about, pictures, a campaign and a time. A live character count checks the text against every network's limit. When you're happy, you send it for approval; once someone else approves it, it's published at its time. The same page opens when you click an existing post, titled Edit post.
Where to find it
- Sidebar → Clients & Pursuits → Marketing, then the Studio tab, then Write a post (top right). The Marketing tabs stay visible above the composer, with Studio highlighted.
- Click any post on Marketing Studio (calendar, All posts or Waiting for your approval) or on a campaign in Campaigns to open it here.
- Draft a post on a moment in Marketing Studio opens the AI draft here.
- Back to Marketing Studio (top right) or the breadcrumb takes you back.
Who can use it
- People allowed to write social posts and see the posting calendar: by default Business Owners and Admins (other roles if granted under Sidebar → Admin → Settings → Roles & permissions).
- Anyone who can open the page can save drafts and send them for approval. Approving is done on Marketing Studio by a different person.
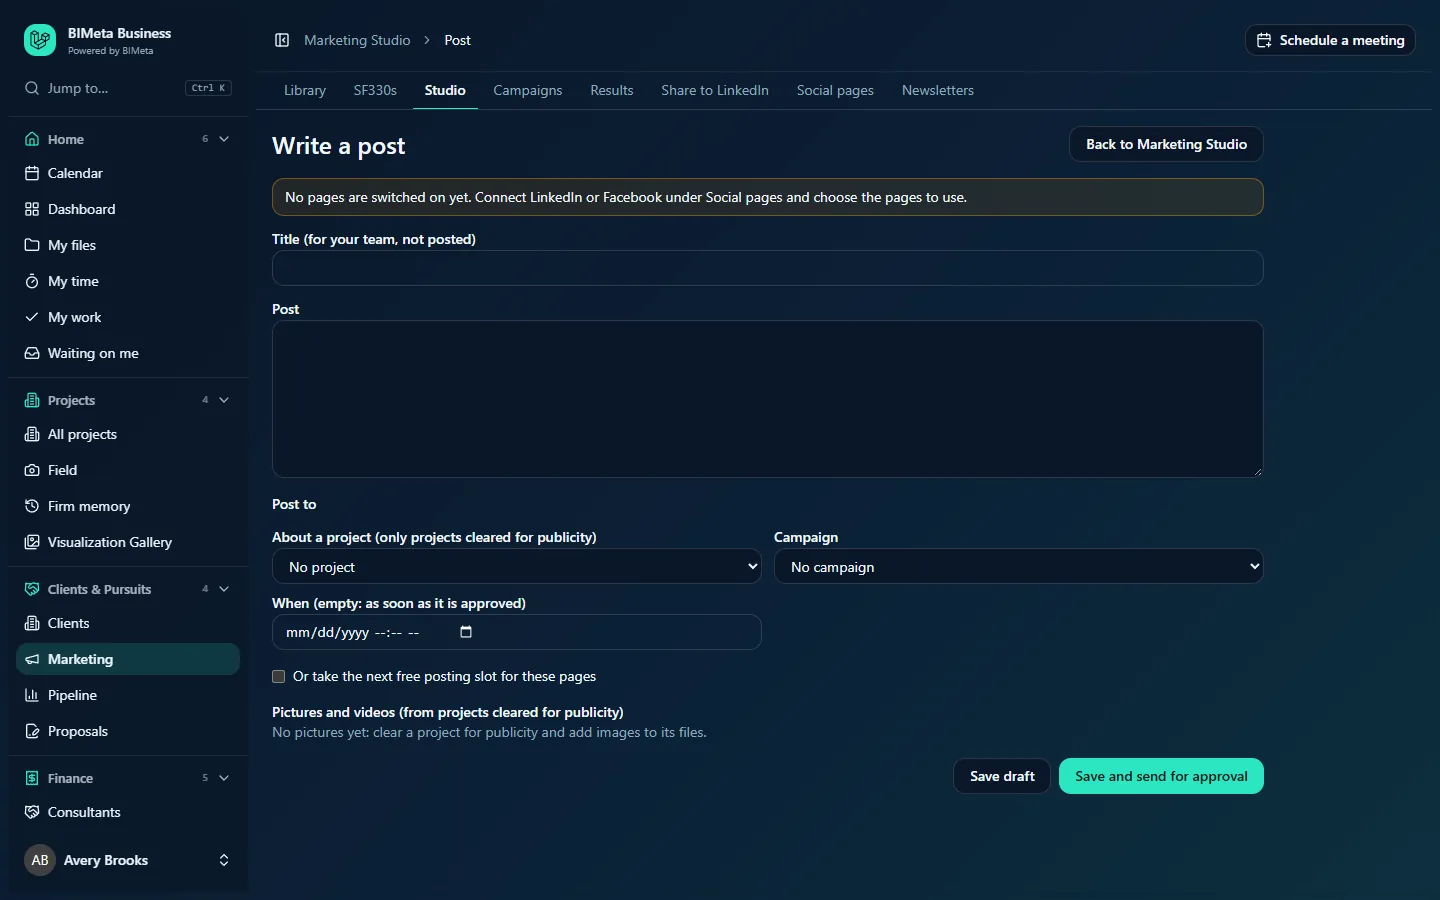
A tour of the page
Messages at the top
- No pages are switched on yet. Connect LinkedIn or Facebook under Social pages and choose the pages to use. appears when the firm has no pages switched on (as in the screenshot). You can still write and save, but you can't choose where to post until pages are on.
- This post is approved or published and can no longer be changed. appears on approved or published posts; the form is then read-only.
- Brand voice: if the brand kit has voice notes, click to expand them as a reminder while you write.
- When editing, a badge next to Edit post shows the post's status.
The form
- Title (for your team, not posted): an internal name, up to 160 characters, shown in lists and the calendar (e.g. Library opening).
- Post (required): the main text used on every page unless a network has its own wording. If the brand kit lists standard hashtags, they appear as buttons under the box; click one to add it to the end of the text.
- Post to: a tick box for each page that's switched on, shown as network and page name (e.g. LinkedIn · Northlight Architects).
- Wording for [network] (optional): one box for each network you ticked. Leave it empty to use the main post, or write a version that suits that network. Next to it, a counter such as 412 / 3000 shows the length of what will actually be sent (including the brand kit's disclaimer, if there is one) against the network's limit; it turns red when you're over. Underneath you see a preview of the final text. For Instagram, a warning reminds you that Instagram posts need at least one picture.
- About a project (only projects cleared for publicity): link the post to a project, or No project. Only cleared projects not under a non-disclosure agreement are listed.
- Campaign: put the post in a campaign, or No campaign.
- When (empty: as soon as it is approved): a date and time to publish. Leave empty to publish shortly after approval.
- Or take the next free posting slot for these pages: instead of a time, use the next regular posting time (set on Campaigns) that all the chosen pages share and that no other post is using, within the next 60 days.
- Pictures and videos (from projects cleared for publicity): tick the images or videos to attach. The list contains branded graphics made in Marketing Studio, Visualization Gallery work approved for marketing on cleared projects, and image and video files from cleared projects' files, each labeled with its project (videos are marked (video)). If nothing is available: No pictures yet: clear a project for publicity and add images to its files.
- Save draft and Save and send for approval.
Character limits per network
| Network | Longest post | Needs |
|---|---|---|
| 3,000 | ||
| 63,206 | ||
| 2,200 | At least one picture | |
| Google Business Profile | 1,500 | |
| YouTube | 5,000 | A video |
| 500 | A picture | |
| Threads | 500 | |
| X | 280 |
AI helpers (saved drafts only)
Once a post is saved and still editable, an AI helpers section appears below the form. Helpers work on the saved draft, so save your changes first. Their results are drafts: the post still needs approval. Each button shows roughly how many AI credits it uses:
- Word it for each network: writes a version for each chosen network, kept under its limit, into the Wording for boxes.
- Suggest hashtags: adds the brand kit's hashtags first, then up to five more, to the end of the post.
- Describe the pictures (only when pictures are attached; credits are per picture): writes a description of each picture for screen readers. The descriptions are listed under the helpers. Pictures larger than 4 MB are skipped.
- Translate to a new draft (when your firm uses more than one language): choose the language and click; a separate translated draft is created and opened.
Posts drafted by AI show a Drafted with AI badge and a Written from these records list, linking to the records the draft used, so the approver can check every fact.
How to…
Write and send a post for approval
- Click Write a post on Marketing Studio.
- Give it a Title for your team (optional) and write the Post.
- Tick the pages under Post to.
- Check each network's counter. If one is red, shorten the text or write a shorter Wording for that network.
- Optionally choose a cleared project, a Campaign, and pictures.
- Set When, tick Or take the next free posting slot, or leave both empty to post right after approval.
- Click Save and send for approval. You go back to Marketing Studio with Sent for approval, and the post shows Waiting for approval.
Save a draft to finish later
- Click Save draft. The page reloads as Edit post with Draft saved, and the AI helpers appear.
- Come back to it any time from Marketing Studio.
Use the AI helpers
- Save the draft first.
- Click the helper you want and wait for it to finish. The page reloads with the result, for example Wording written for 2 networks or Added #architecture #schools.
- Review and edit the result, then Save and send for approval.
Change a post
- Open it from Marketing Studio. Only drafts and posts waiting for approval can be changed.
- Make your changes and save. Any change sends the post back to Draft and clears earlier approvals, so send it for approval again.
- Approved or published posts can't be changed: cancel them on Marketing Studio and write a new one.
Tips and good to know
- If the brand kit has a disclaimer, it's added to the end of every post on every network automatically; the counters already include it.
- Words listed under Words never to use in the brand kit block saving: you'll see which word to remove.
- When the firm tracks links (Results settings), web addresses in published posts are replaced by short tracked links on the firm's own address, so clicks can be counted.
- Times are entered in your browser's local time.
- Saving, sending for approval and AI helper use are recorded in the firm's audit log.
Troubleshooting / FAQ
"LinkedIn allows 3000 characters; this post has 3150."
The text (plus any disclaimer) is too long for that network. Shorten the main post or write a shorter Wording for that network.
"That project isn't cleared for publicity."
The project must be cleared on Social pages → Projects that may be publicised by someone with access, and must not be under an NDA.
"No free posting slot in the next 60 days for those pages."
The chosen pages don't share a free regular posting time. Add slots on Campaigns → Posting slots, choose fewer pages, or set a time yourself.
"Choose a time in the future, or leave it empty to post as soon as it is approved."
The time in When has already passed. Pick a later time or clear it.
"The brand kit doesn't allow: …"
The text contains a word or phrase from the brand kit's banned list. Reword it.
Was this article helpful?
Share