



Proposals: write, send and win fee proposals
18 views · by Kevin J Bruno · updated 7 hours ago
Proposals is where you write fee proposals for clients and prospects: a scope of services broken down by phase, a fee for each, an introduction and your terms. When it's ready you issue it, which gives it a proposal number and emails the client a private link. The client can read it online and accept it by typing their name, or decline it. Acceptance opens the project automatically, with the proposal's scope and fees locked in as the project's fee baseline, and marks the related pursuit as won.
Where to find it
- Sidebar → Clients & Pursuits → Proposals.
- Press Ctrl K and type "Proposals".
- Click a proposal number in the list to open that proposal; use the breadcrumb or the sidebar to come back.
Who can use it
- People allowed to write and send proposals and record their outcome. By default that is Business Owners, Admins, Project Managers, IT Staff and BIM Managers. Users and Human Resources don't see Proposals.
- Marking a proposal accepted opens a project, so the Mark accepted and open project form also needs permission to create projects. All of the roles above have it by default.
- The Draft the scope from the RFP AI helper only appears when your firm has AI turned on (Sidebar → Admin → Settings → AI).
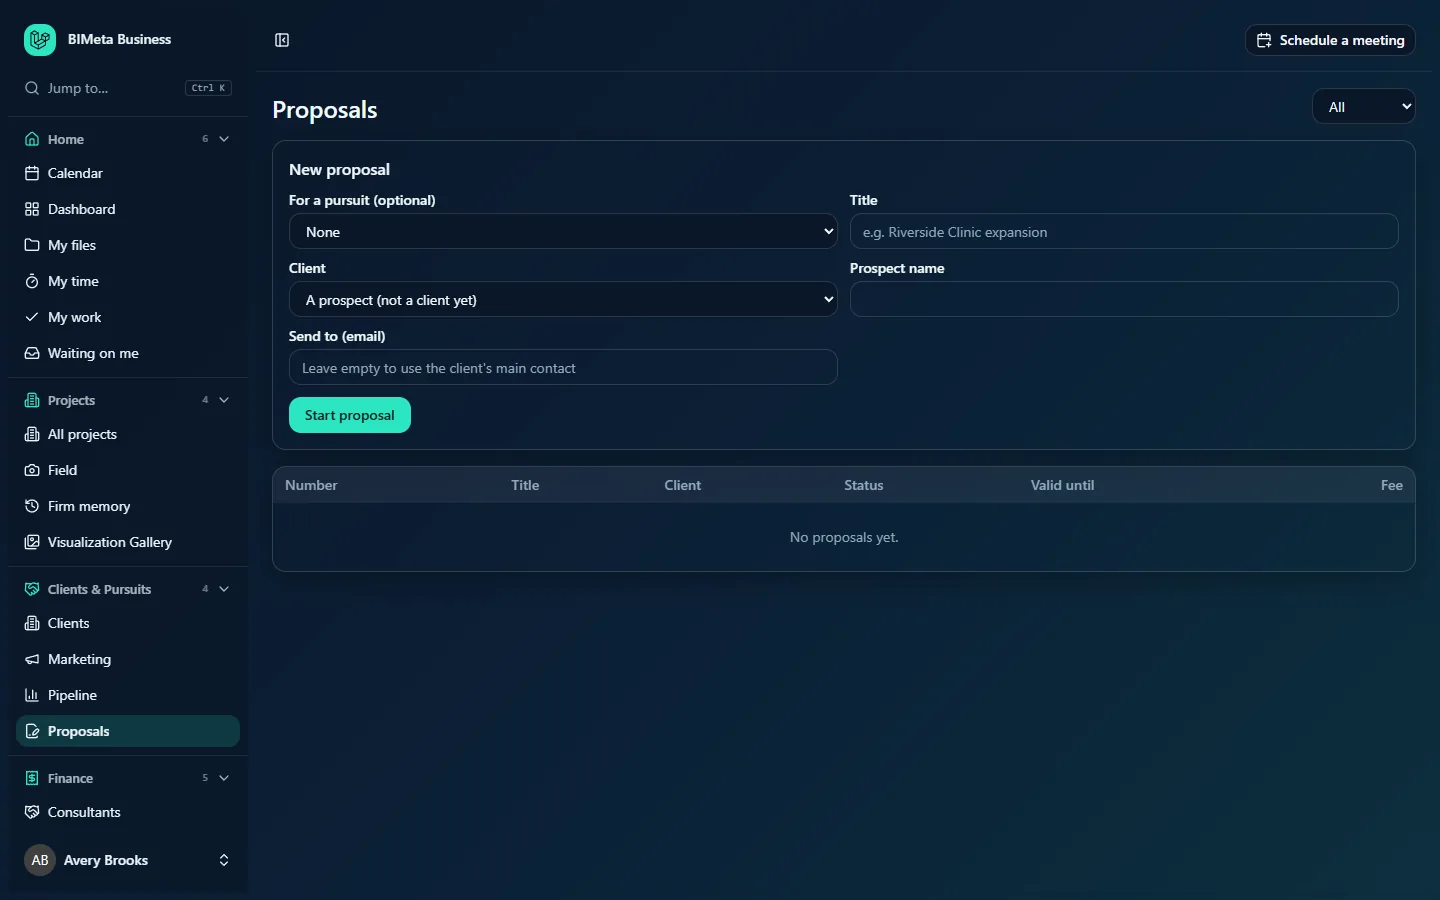
A tour of the Proposals page
Status filter
The drop-down at the top right filters the list: All (the default), Draft, Sent, Accepted or Declined.
New proposal
A form to start a proposal:
- For a pursuit (optional): pick one of the firm's open pursuits from the Pipeline, or leave it on None. Choosing a pursuit fills in its client and, if Title is still empty, uses the pursuit's name as the title.
- Title (required): up to 200 characters, e.g. Riverside Clinic expansion.
- Client: one of your active clients, or A prospect (not a client yet).
- Prospect name: appears only while A prospect is selected. Type the organization's name (up to 200 characters).
- Send to (email): who the proposal will be emailed to. Leave it empty to use the client's main contact (or, failing that, the first contact with an email address).
- Start proposal: creates the draft and opens it.
The proposal list
Newest first (up to 300), with these columns:
- Number: the proposal number as a link (e.g. PRP-26001), or Draft for proposals that haven't been issued yet. Numbers are given only when a proposal is issued.
- Title and Client (the client's name, or the prospect's name).
- Status: a badge reading Draft, Sent, Accepted or Declined.
- Valid until: the date the offer expires.
- Fee: the total fee.
When there are none, the list says No proposals yet.
A tour of a proposal
Clicking a proposal opens its own page. What you see depends on its status.
Header
- The proposal number (or Draft proposal), its status badge and the client or prospect.
- Print: opens a clean, printable version in a new tab. Use your browser's Print to save it as a PDF.
While it's a draft
- Details form: Title (required), Send to (email), Valid until (set to 30 days after you started it), Introduction and Terms (each up to 20,000 characters; terms may start pre-filled with your firm's standard terms, if it has them). Click Save to keep changes.
- Scope of services: a table of Phase, Services and Fee, with a Total fee at the bottom and a bin button on each row to remove it. Empty at first: No services yet. Split a total fee across the phases, or add services one by one.
- Draft the scope from the RFP (when AI is on): upload the client's request for proposals and click Suggest scope.
- Split a total fee by phase: type a total and click Split.
- Add a service: a phase (or No phase), a description and a fee, then Add.
- Issue and send: greyed out until the total fee is more than zero.
Once it's sent
- The title and Valid until date are shown as text; the scope is read-only.
- Right after you issue it, a box shows the client's private link with a Copy button. It is shown only now, so copy it if you need it.
- Accepted by (client signatory) and Mark accepted and open project: record an acceptance you received on paper or by email.
- Reason (optional) and Mark declined: record that the client said no.
Once it's decided
- Accepted: Accepted by [name] on [date]. followed by a link to the project it opened.
- Declined: Declined on [date]. followed by the reason, if one was given.
How to…
Start a proposal
- On Proposals, optionally choose the pursuit in For a pursuit (optional).
- Check the Title and Client, or choose A prospect (not a client yet) and type the Prospect name.
- Optionally type a Send to (email) address.
- Click Start proposal. The draft opens with the message Proposal drafted. Add the scope and fees next.
Build the scope and fees
There are three ways, and you can combine them:
- Split a total fee by phase. Type the total fee (e.g.
480000) under Split a total fee by phase and click Split. One line per phase is created using your firm's phase fee percentages (set in Sidebar → Admin → Settings → Setup → Phases & fee split); any rounding difference goes to the last phase. This replaces every service already in the table. - Add services one by one. Under Add a service, choose a phase (or No phase), describe the service (required, up to 300 characters, e.g. Existing conditions survey), type its Fee (required, zero or more) and click Add. The total updates automatically.
- Let AI read the RFP. Under Draft the scope from the RFP, choose the RFP file (a PDF or a text file, up to 20 MB) and click Suggest scope. While it works the button reads Reading the RFP…. This uses AI credits.
To remove a line, click the bin button at the end of its row.
Review the AI's suggested scope
- After Suggest scope, a Suggested scope from [file name] box appears with a short summary and the suggested items, each with its phase. AI can miss or misread things. Check each item against the RFP before adding it.
- All items start ticked. Untick any you don't want.
- Optionally type a Total fee to split (optional) to spread a fee across the chosen items.
- Click Add [n] items. They're added to the scope, and you can adjust or remove them like any other line.
- Or click Discard suggestion to throw the suggestion away. Nothing reaches the proposal until you add items.
Write the introduction and terms
- Type your covering words in Introduction and your conditions in Terms.
- Check Valid until and Send to (email).
- Click Save.
Issue and send it
- Make sure the scope has a total fee above zero and your details are saved.
- Click Issue and send.
- The proposal gets its number from your firm's proposal numbering pattern (by default like PRP-26001; a Business Owner or Admin can change it in Sidebar → Admin → Settings → Setup → Document numbering), its status becomes Sent, and from then on it can't be changed.
- If there is a Send to address, the client is emailed "Proposal [number] from [your firm]: [title]" with the total fee, the valid-until date and a button to the private link. You'll see Proposal [number] sent to [email].
- If there's no address, or the email couldn't be sent, the proposal is still issued and you're asked to share the link yourself.
- Copy the private link from the box if you want to send it another way. It is only shown once.
What the client sees
The private link opens a clean page titled Proposal [number] from [your firm], prepared for the client, with the introduction, the scope and fees by phase, the total and the terms. While the offer is open and in date, the client can:
- Accept this proposal: type their full name in Type your full name to sign, tick the box confirming I am authorised to accept this proposal and agree to its scope, fees and terms, and click Accept and sign.
- Not going ahead?: optionally Tell us why and click Decline.
If the valid-until date has passed, the page says the proposal has expired and asks them to request an updated one. The client doesn't need an account; the link itself is the key, so treat it like a password.
Record an acceptance yourself
- Open the sent proposal.
- Type the client signatory's name in Accepted by (client signatory).
- Click Mark accepted and open project.
- You're taken to the new project: Accepted! Project [number] is open with its fee baseline locked.
Record a decline
- Open the sent proposal.
- Optionally type a Reason (up to 500 characters).
- Click Mark declined.
What happens when a proposal is accepted
Whether the client accepts online or you mark it accepted:
- A new project opens with the proposal's title, your firm's next project number, its standard folder tree and first-phase checklist, linked to the client (or carrying the prospect's name).
- Every scope line is copied into the project with its phase and fee, and the scope is locked as the project's fee baseline, so later changes are tracked against what was agreed.
- The proposal records who accepted it and when, and links to the project.
- If the proposal was for a pursuit, that pursuit is marked Won on the Pipeline and linked to the project.
- If your firm uses webhooks for connected apps, a "proposal accepted" event is sent.
- The acceptance, decline, issuing and AI scope steps are all recorded in the firm's audit log.
Tips and good to know
- A sent proposal can't be edited. To change one, start a new proposal (a new version) and send that instead.
- Proposals can only be accepted while they're Sent and still within their Valid until date. Before sending, check that date is far enough ahead.
- The currency is your firm's currency from its profile settings.
- The private link is stored only in scrambled form, so nobody, including you, can look it up again later. If you lose it and the email didn't arrive, issue a new version.
- Phases in the drop-downs are your firm's phases from Sidebar → Admin → Settings → Setup → Phases & fee split.
Troubleshooting / FAQ
Why is Issue and send greyed out?
The total fee is zero. Add at least one service with a fee, or split a total fee by phase.
"Your phases have no fee split yet. Set one in Setup, Phases & fee split."
Your firm's phases don't have fee percentages. A Business Owner or Admin can set them in Sidebar → Admin → Settings → Setup → Phases & fee split. Until then, add services one by one.
"A sent proposal can't be changed. Copy it to make a new version."
The proposal was already issued. Start a new proposal for the same client with the corrected scope and send that.
The client says the link shows "This proposal has expired."
The Valid until date has passed. Issue a new version with a later date.
I don't see Draft the scope from the RFP.
It appears only on drafts, only when AI is turned on for your firm, and not while an earlier suggestion is waiting for review (add its items or discard it first).
Was this article helpful?
Share