Creating a project
19 views · by Kevin J Bruno · updated 1 day ago
The New project form creates a project in a few seconds. BIMeta numbers it from your firm's pattern, builds your firm's folder template inside it and starts the first phase's deliverables checklist, so the project is ready to use as soon as you save.
Where to find it
- Sidebar → Projects → All projects → New project (top right of the list).
- The breadcrumb reads All projects › New project.
Who can use it
People who can create projects: Business Owner, IT Staff, BIM Manager, Admins and Project Managers. Regular Users don't see the button, and opening the form directly is refused.
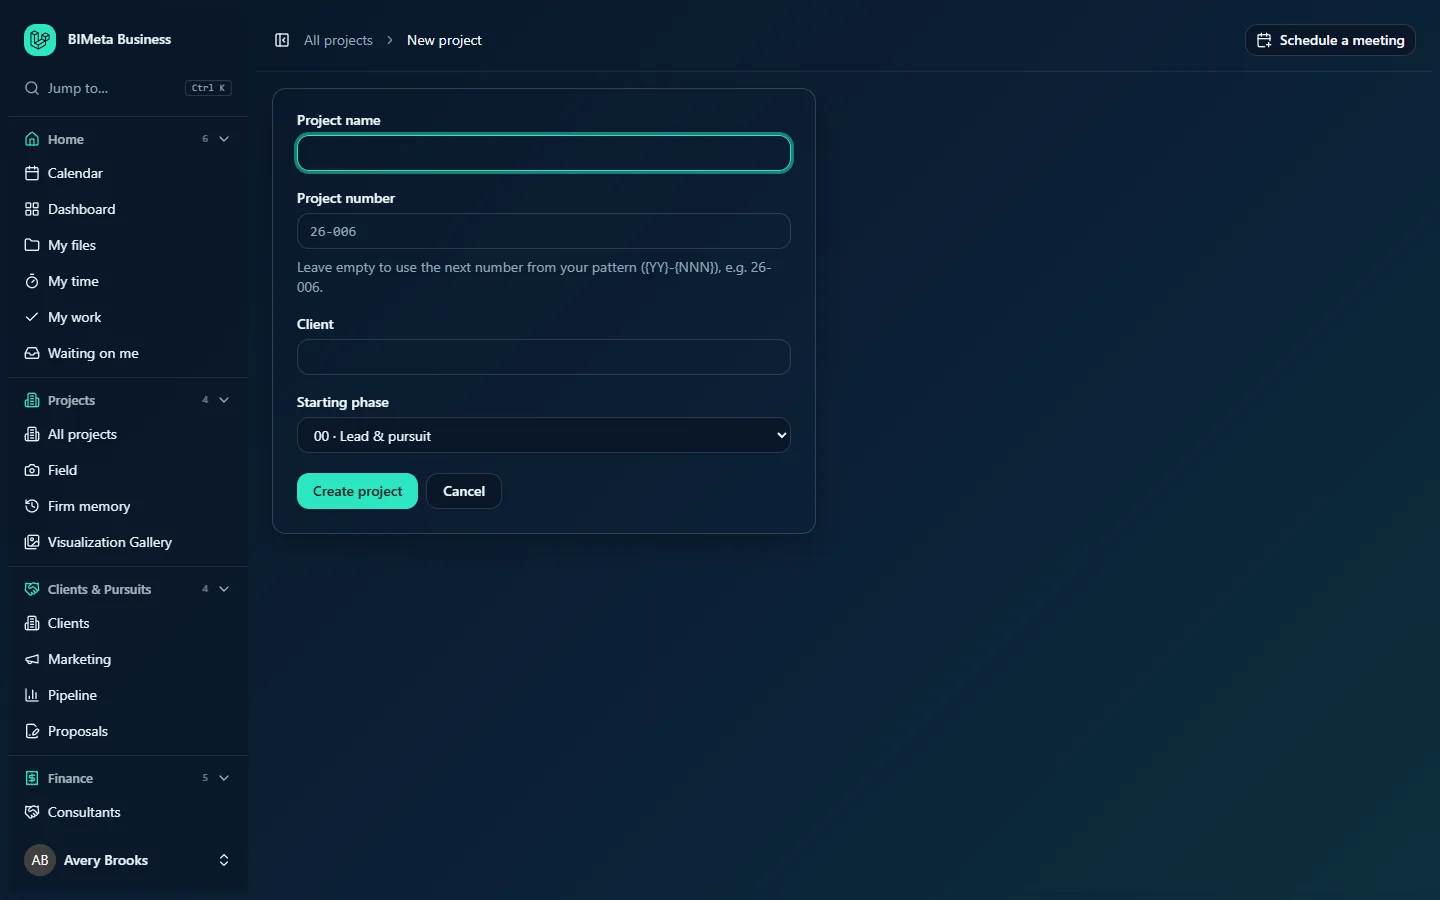
A tour of the form
| Field | Required? | What to enter |
|---|---|---|
| Project name | Yes | The project's name, up to 200 characters, e.g. Riverbend Clinic Expansion. The cursor starts here. |
| Project number | No | Leave it empty to take the next number from your firm's pattern. The grey example in the box and the help text show the pattern and the next number, e.g. "Leave empty to use the next number from your pattern ({YY}-{NNN}), e.g. 26-006." You can type your own number instead (up to 40 characters), but it must not already be used by another project. |
| Client | No | The client's name, up to 200 characters, e.g. Riverbend Health. It's shown under the project name and in the project list. |
| Office | Only shown, and then required, when your numbering pattern includes an office code | Pick one of your firm's offices (listed as code · name, from your firm profile). |
| Client code | Only shown, and then required, when your numbering pattern includes a client code | A short code for the client, up to 10 characters. It's saved in capitals. |
| Starting phase | Yes | The lifecycle phase the project starts in, shown as code · name, e.g. 00 · Lead & pursuit. It defaults to your first phase. Pick a later phase when you're setting up a job that's already under way, e.g. 04 · Schematic Design. |
At the bottom are Create project and Cancel (back to the list without saving).
How to create a project
- Go to All projects and click New project.
- Type the Project name.
- Leave Project number empty to use the next number, or type a number you've already agreed with the client.
- Type the Client name.
- If shown, choose the Office and type the Client code.
- Choose the Starting phase.
- Click Create project. The button shows a spinner while it saves.
What happens next:
- The project is created as active and you land on its Overview tab, with a message such as "Project 26-006 created with 24 folders".
- Your firm's folder template (set under Admin → Settings → Setup → Project folders & app bindings (a step in the Project standards section of Setup)) is created in the project's Files tab.
- The starting phase's deliverables checklist is added to the Overview.
- The creation is recorded in the audit log with the number, phase and number of folders.
Tips and good to know
- Your numbering pattern is set under Admin → Settings → Setup → Project numbering. Patterns can use the year, a running number, an office code and a client code.
- Typing your own number doesn't skip ahead in the pattern; the next empty-number project still takes the next free number.
- You aren't added to the project team automatically. If you'll work on the project, add yourself and colleagues on the Team tab so they can be assigned tasks and, for staff without firm-wide rights, edit the project.
- Projects for won work can be opened straight from Pipeline or Proposals instead; they get the same numbering, folders and checklist.
Troubleshooting
"That project number is already in use. Pick another."
Another project already has the number you typed. Change it, or clear the box to use the next number from your pattern.
"Choose a starting phase."
The phase you picked is no longer switched on in your firm's lifecycle. Reload the page and pick again.
The project has no folders.
Your firm may not have a folder template yet. You can add it later from the project's Files tab with Add your firm's folder template.
Was this article helpful?
Share