Costs: price model quantities and track the estimate
17 views · by Kevin J Bruno · updated 4 days ago
The Costs tab turns model quantities into a construction cost estimate. Quantities come from a Revit schedule you upload or straight from the BIMeta add-in when the model syncs. Each line is priced against your firm's cost library, the project's markups (contingency, escalation, overhead and profit, tax) are applied, and you can record the estimate at each stage to compare it with the client's construction budget and with the stage before. Where cost items carry carbon factors, it also shows embodied carbon.
Where to find it
Open a project and choose Money → Costs. The Budget tab's construction cost card links here too. (The browser tab reads "Quantities to cost".)
Who can use it
- Everyone who can see the project can see the estimate and download it as CSV.
- Adding quantities, saving the project's estimate settings and recording a stage estimate need permission to edit the project (Business Owner, IT Staff, BIM Manager, Admin, Project Manager, or a project role of Project Manager, Project Architect or Designer).
- The Firm cost library section is only shown to people who manage BIM settings: Business Owner, BIM Manager and Admins.
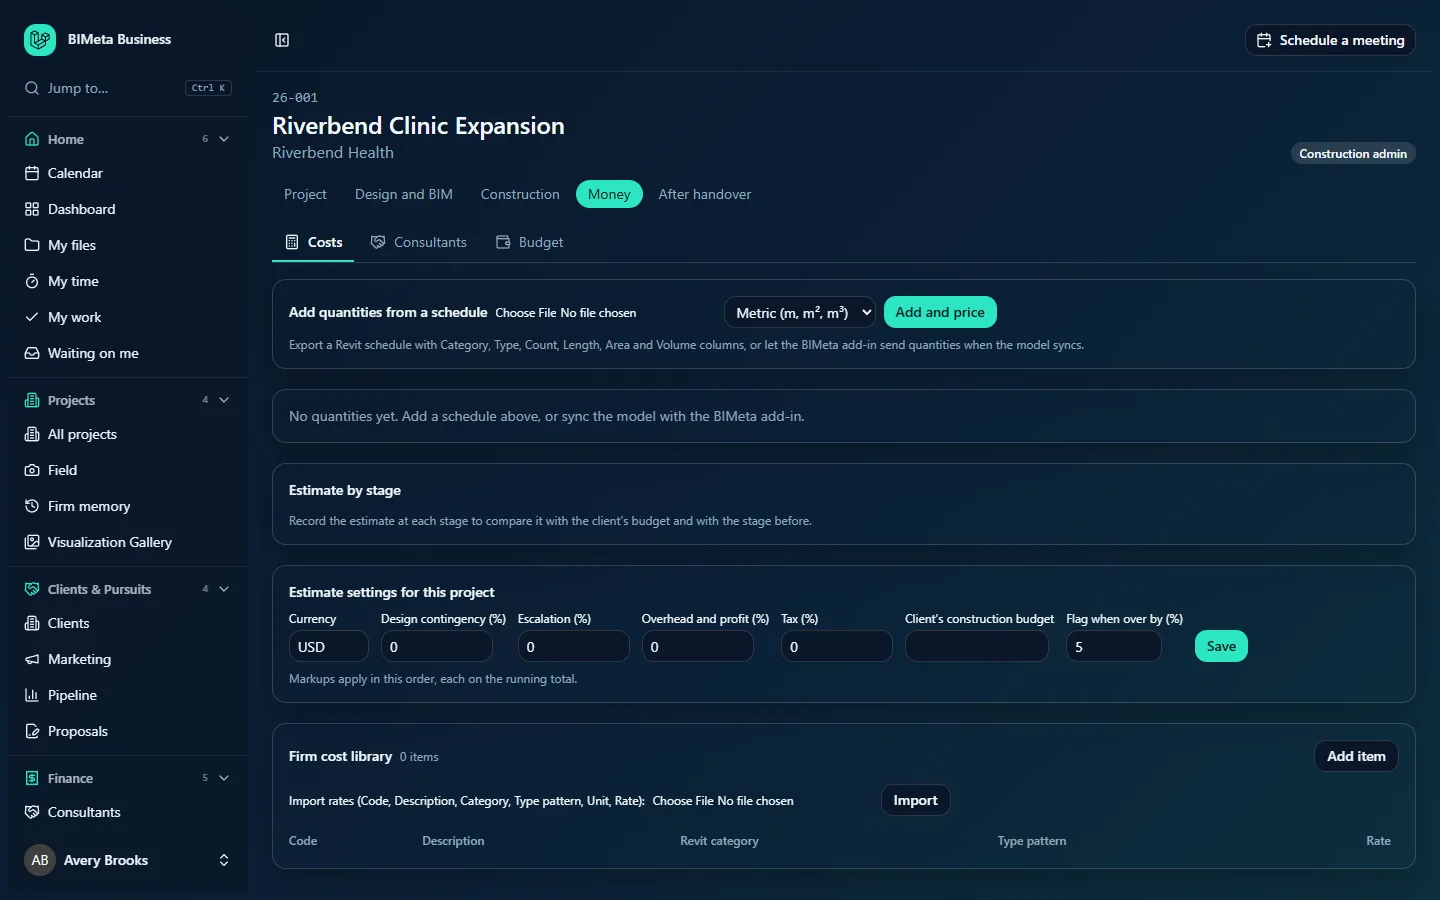
A tour of the page
Add quantities from a schedule
Choose a Schedule (.csv, .txt or .xlsx) file, pick the units, Metric (m, m², m³) or Imperial (ft, ft², ft³), and click Add and price. The help text: export a Revit schedule with Category, Type, Count, Length, Area and Volume columns, or let the BIMeta add-in send quantities when the model syncs.
The estimate
Without quantities: "No quantities yet. Add a schedule above, or sync the model with the BIMeta add-in." With quantities:
- The quantity set's name, a badge From a schedule or From the add-in, and when it arrived. With several sets, a Quantity set drop-down picks which one to price. Download CSV exports the estimate.
- Three figures: Total, Since the previous quantities (how much the total changed) and Not priced (how many categories and types had no rate).
- A bar per Revit category showing its share of the cost.
- The estimate table: Category, Type, Cost item (code and description), Quantity with unit, Rate and Amount, then Subtotal, each markup with its percentage, and Total.
- No rate in the cost library for these: the category · type · count of anything not priced, so you know which cost items to add.
Embodied carbon
Product stage A1–A3 carbon from the carbon factor on each cost item, in tonnes CO2e, with a note when some priced lines have no carbon factor yet. Options and model syncs compared sets cost and carbon of different quantity sets side by side. Without carbon factors it explains how to add them (kg CO2e per unit from the product's EPD).
Estimate by stage
The estimate recorded at each stage, with Construction budget shown when set. Columns: Stage (with any note), Estimate, Against budget (percent over or under, and "over budget" when it passes your alert level) and Recorded (date and who). Editors get a stage drop-down (defaulting to the project's phase), an optional Note, and Record this estimate for the stage.
Estimate settings for this project
Currency (3-letter code), Design contingency (%), Escalation (%), Overhead and profit (%), Tax (%), Client's construction budget and Flag when over by (%) (0–50, default 5), with Save. "Markups apply in this order, each on the running total."
Firm cost library
For BIM settings managers: the item count, Add item, and Import rates (Code, Description, Category, Type pattern, Unit, Rate): with a file and Import. The table lists Code, Description, Revit category, Type pattern, Unit, Rate and carbon, with Edit and Retire on each item.
How to …
Price a Revit schedule
- In Revit, export a schedule with Category, Type, Count, Length, Area and Volume columns (CSV, TXT or XLSX, up to 20 MB).
- Choose the file, pick the units and click Add and price ("Quantities added and priced").
- Check No rate in the cost library for these and ask your BIM Manager to add rates for anything missing.
Set the project's markups and budget
- Fill in the Estimate settings for this project and click Save ("Estimate settings saved").
Record the estimate for a stage
- Pick the quantity set you want, if there are several.
- Under Estimate by stage, choose the stage, add a note if useful and click Record this estimate for the stage ("Recorded as the phase estimate").
Add or import cost items (BIM settings managers)
- Click Add item and fill in Code (up to 30 characters), Description, Revit category (e.g. Walls), Type pattern (e.g. Basic Wall*, to match types; blank matches any), Unit, Rate and optionally Embodied carbon, kg CO2e per unit. Click Save item.
- Or import a CSV/XLSX file with Code, Description, Category, Type pattern, Unit and Rate columns ("n added, m updated").
- Retire an item to stop it pricing new estimates.
Tips and good to know
- The cost library is shared by every project, so one BIM Manager keeps rates current for the whole firm.
- The latest recorded stage estimate feeds the Budget tab's construction cost card.
- Exported CSV cells are made safe for spreadsheets automatically.
- Exporting the estimate is recorded in the audit log.
Troubleshooting
Everything shows as not priced.
The cost library has no items matching those Revit categories and types. Add items, or widen a type pattern with *.
I don't see the Firm cost library.
Only people who manage BIM settings see and change it.
Was this article helpful?
Share