

BEP: the BIM execution plan and project kickoff
18 views · by Kevin J Bruno · updated 3 days ago
A BIM execution plan (BEP) is the agreement, at the start of a project, about how the team will use building information modelling: who is responsible for what, which software and versions everyone uses, how developed each part of the model must be at each stage, how files and sheets are named, where the shared coordinates are, and how often each discipline shares its model. Writing it down early avoids the classic problems of mismatched Revit versions, models that don't line up and nobody knowing who owns what. The BEP tab gives you a ready-made plan to fill in, issues it as lettered revisions saved to the project's files, and offers a one-click Project kickoff that sets the project up the firm's way.
Key terms
- Level of information need (often called LOD, level of development): how complete and detailed a model element is. LOD 100 is a rough mass or symbol, LOD 200 approximate size and shape, LOD 300 precise geometry, LOD 350 adds connections to other elements, LOD 400 is fabrication-ready and LOD 500 is verified as built.
- Project base point and survey point: the reference points that tie every discipline's model to the same location, so they line up when combined. True north is the real-world orientation.
- ISO 19650 container folders: the four standard areas of a common data environment: 01 Work in progress, 02 Shared, 03 Published and 04 Archived.
Where to find it
Open a project, choose the Design and BIM group, then the BEP tab. The group also holds 3D, 4D, Clashes, Exchanges, Scans, Drawings, Containers, Certification, Code and Specs. Issued revisions also appear on the project's Files tab.
Who can use it
- Everyone who can open the project can read the plan.
- Editing, issuing and kicking off need permission to edit the project: Business Owners, Admins, IT Staff, BIM Managers and Project Managers firm-wide, and on the project the Project Manager, Project Architect and Designer roles. Others see the plan as read-only text without the buttons.
- Sending the project template to the team's computers during kickoff also needs permission to deploy BIM software (Business Owners, Admins and BIM Managers). Without it the rest of the kickoff still happens and you're told the template wasn't sent.
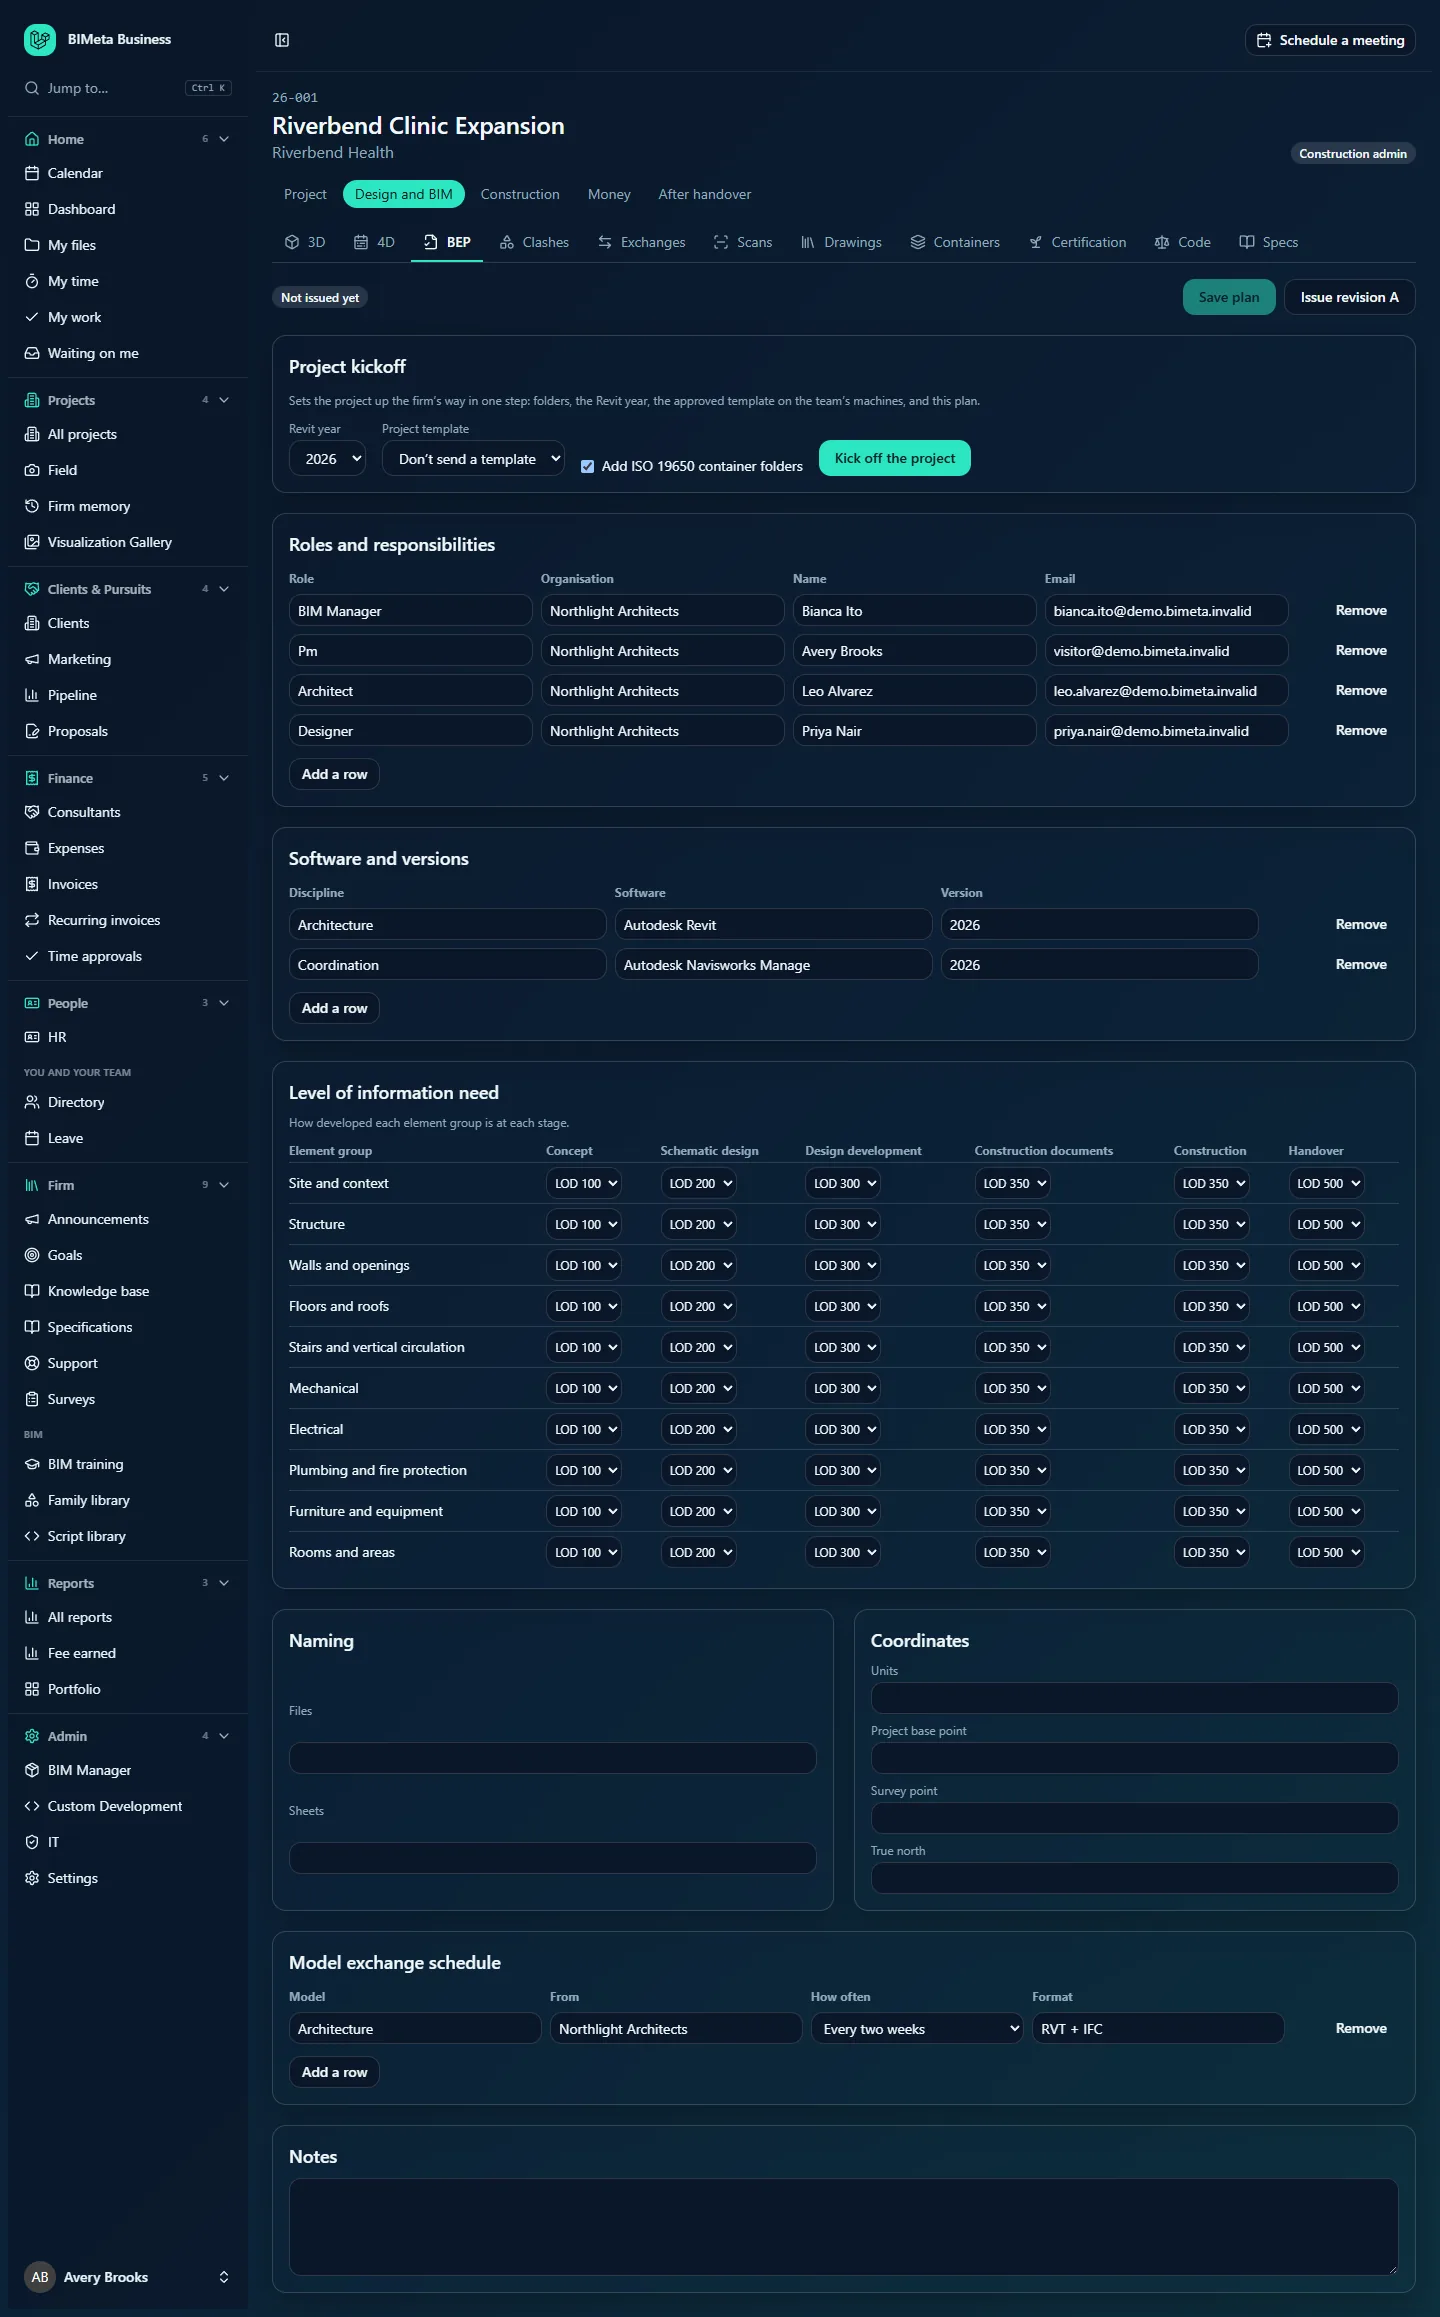
A tour of the page
Status bar
On the left, the plan's state: Not issued yet, or "Rev X issued date", plus Changed since the last issue if it has been edited since. On the right, Save plan and Issue revision A (later Issue the next revision).
Project kickoff
"Sets the project up the firm's way in one step: folders, the Revit year, the approved template on the team's machines, and this plan." It has Revit year, Project template (your firm's approved templates, or Don't send a template), an Add ISO 19650 container folders tick box and Kick off the project. Once done, it shows "Kicked off date on Revit year" and the template version.
Roles and responsibilities
Rows of Role, Organisation, Name and Email. A new plan is pre-filled with your firm's BIM Managers and everyone on the project team with their project role, e.g. BIM Manager · Northlight Architects · Bianca Ito. Add consultants with Add a row; Remove deletes a row. Up to 40 rows.
Software and versions
Discipline, Software and Version, starting with Autodesk Revit for Architecture and Autodesk Navisworks Manage for Coordination at the project's Revit year. Up to 20 rows.
Level of information need
"How developed each element group is at each stage." A grid of ten element groups (Site and context, Structure, Walls and openings, Floors and roofs, Stairs and vertical circulation, Mechanical, Electrical, Plumbing and fire protection, Furniture and equipment, Rooms and areas) against six stages (Concept, Schematic design, Design development, Construction documents, Construction, Handover). Each cell is a level from — (not required) to LOD 500. The usual starting levels are filled in: LOD 100, 200, 300, 350, 350 and 500 across the stages.
Naming
The Files and Sheets naming conventions, pre-filled from your firm's naming settings (Sidebar → Admin → Settings → Setup, step Sheet, file & model naming in the Project standards section).
Coordinates
Units, Project base point, Survey point and True north.
Model exchange schedule
Rows of Model, From, How often (Weekly, Every two weeks, Monthly, At each milestone) and Format, e.g. Architecture · Northlight Architects · Every two weeks · RVT + IFC. Up to 40 rows. This schedule can be turned into tracked exchanges on the Exchanges tab.
Notes
Anything else the team should know (up to 4,000 characters).
How to …
Kick off a new project
- Choose the Revit year the whole team will use.
- Optionally choose an approved Project template.
- Tick Add ISO 19650 container folders if the project follows ISO 19650.
- Click Kick off the project.
BIMeta then: creates the firm's standard project folders if the project has none (plus the four CDE folders if ticked); sends the template to everyone on the project team for that Revit year (if you can deploy and the team isn't empty); starts the BEP if there isn't one, with the Revit year filled in; and pins the Revit year for the project. A notice lists what was done, e.g. "12 folders created · BIM execution plan started · Revit 2026 pinned for the project". You can run kickoff again later, for example after adding people to the team.
Edit and save the plan
- Change any cell, add rows with Add a row or remove them with Remove. Text fields hold up to 200 characters each (coordinate points up to 300).
- Click Save plan ("Plan saved"). Empty rows are dropped.
Issue a revision
- Save the plan first and make sure at least one role row has a person in it.
- Click Issue revision A (or Issue the next revision).
The plan is saved as a formatted document named like BEP 26-001 Rev A.html in the project's files ("Revision A issued and saved to the project's files."). Each later issue takes the next letter (B, C…). Saving and issuing are recorded in the audit log.
Tips and good to know
- Issue the plan to consultants from the project's Files (share it) once you've agreed it.
- The model review on Model health (Sidebar → Admin → BIM Manager → Model health) compares models with the BEP, for example warning when a model is in a different Revit version from the plan.
- Until the plan is saved, the page shows a suggested starting plan; nothing is stored until you click Save plan or kick off.
Troubleshooting
"Name at least one person and their role before issuing the plan."
Fill in at least one row under Roles and responsibilities, save, then issue.
"Template not sent: deploying needs the BIM deploy permission."
Ask a BIM Manager or Business Owner to run the kickoff with the template, or to send it from the BIM Manager page (Sidebar → Admin → BIM Manager).
"Template not sent: nobody is on the project team yet."
Add people on the project's Team tab, then kick off again.
Why are the fields read-only for me?
You need permission to edit the project. Ask the project manager to give you a project role that can edit.
Was this article helpful?
Share