BIM Manager panel: plugins, settings and deployments
17 views · by Kevin J Bruno · updated 19 hours ago
The BIM Manager panel is the home base for everything to do with the firm's models, BIM standards and design software. The top half launches every BIM tool, grouped by job: model checking, standards and content libraries, the BIMeta add-in for Revit, and the Autodesk Docs connection. The bottom half, Software on machines, is where you manage the plugins (add-ins and extensions) and program settings that go out to people's computers, deploy them, and follow those deployments, including the ones waiting for approval. Use it whenever you roll out a new add-in, change a firm-wide Revit setting, or need to check what reached whose machine.
Where to find it
- Sidebar → Admin → BIM Manager.
- Jump to… (press Ctrl K) and type
BIM Manager,pluginsordeploy. - Every BIM sub-page (Model health, Revit upgrade planner, Standards library, Revit add-in, Autodesk Docs) has a ← BIM Manager link at the top that brings you back here.
Who can use it
The panel opens for anyone allowed to see the BIM Manager panel: the Business Owner, IT Staff, the BIM Manager and, if your firm uses it, the Admin role. A User doesn't see it. What each person can do differs:
| Action | Business Owner | BIM Manager | Admin | IT Staff |
|---|---|---|---|---|
| See the panel, plugins, settings changes and deployments | Yes | Yes | Yes | Yes |
| Add plugins and upload or publish versions | Yes | Yes | Yes | No |
| Create, edit and delete settings changes | Yes | Yes | Yes | No |
| Deploy plugins and settings changes, cancel deployments | Yes | Yes | Yes | No |
| Approve deployments waiting for approval (never your own) | Yes | Yes* | Yes* | Yes |
| Choose who approves deployments | Yes | No | No | No |
| See the Revit add-in and Autodesk Docs tool cards | Yes | Yes | Yes | No |
* Under the rule IT Staff or an Owner approves every deployment, only IT Staff and Owners can approve. Two-factor sign-in is required for the Owner, Admin, IT Staff and BIM Manager roles.
The page at a glance
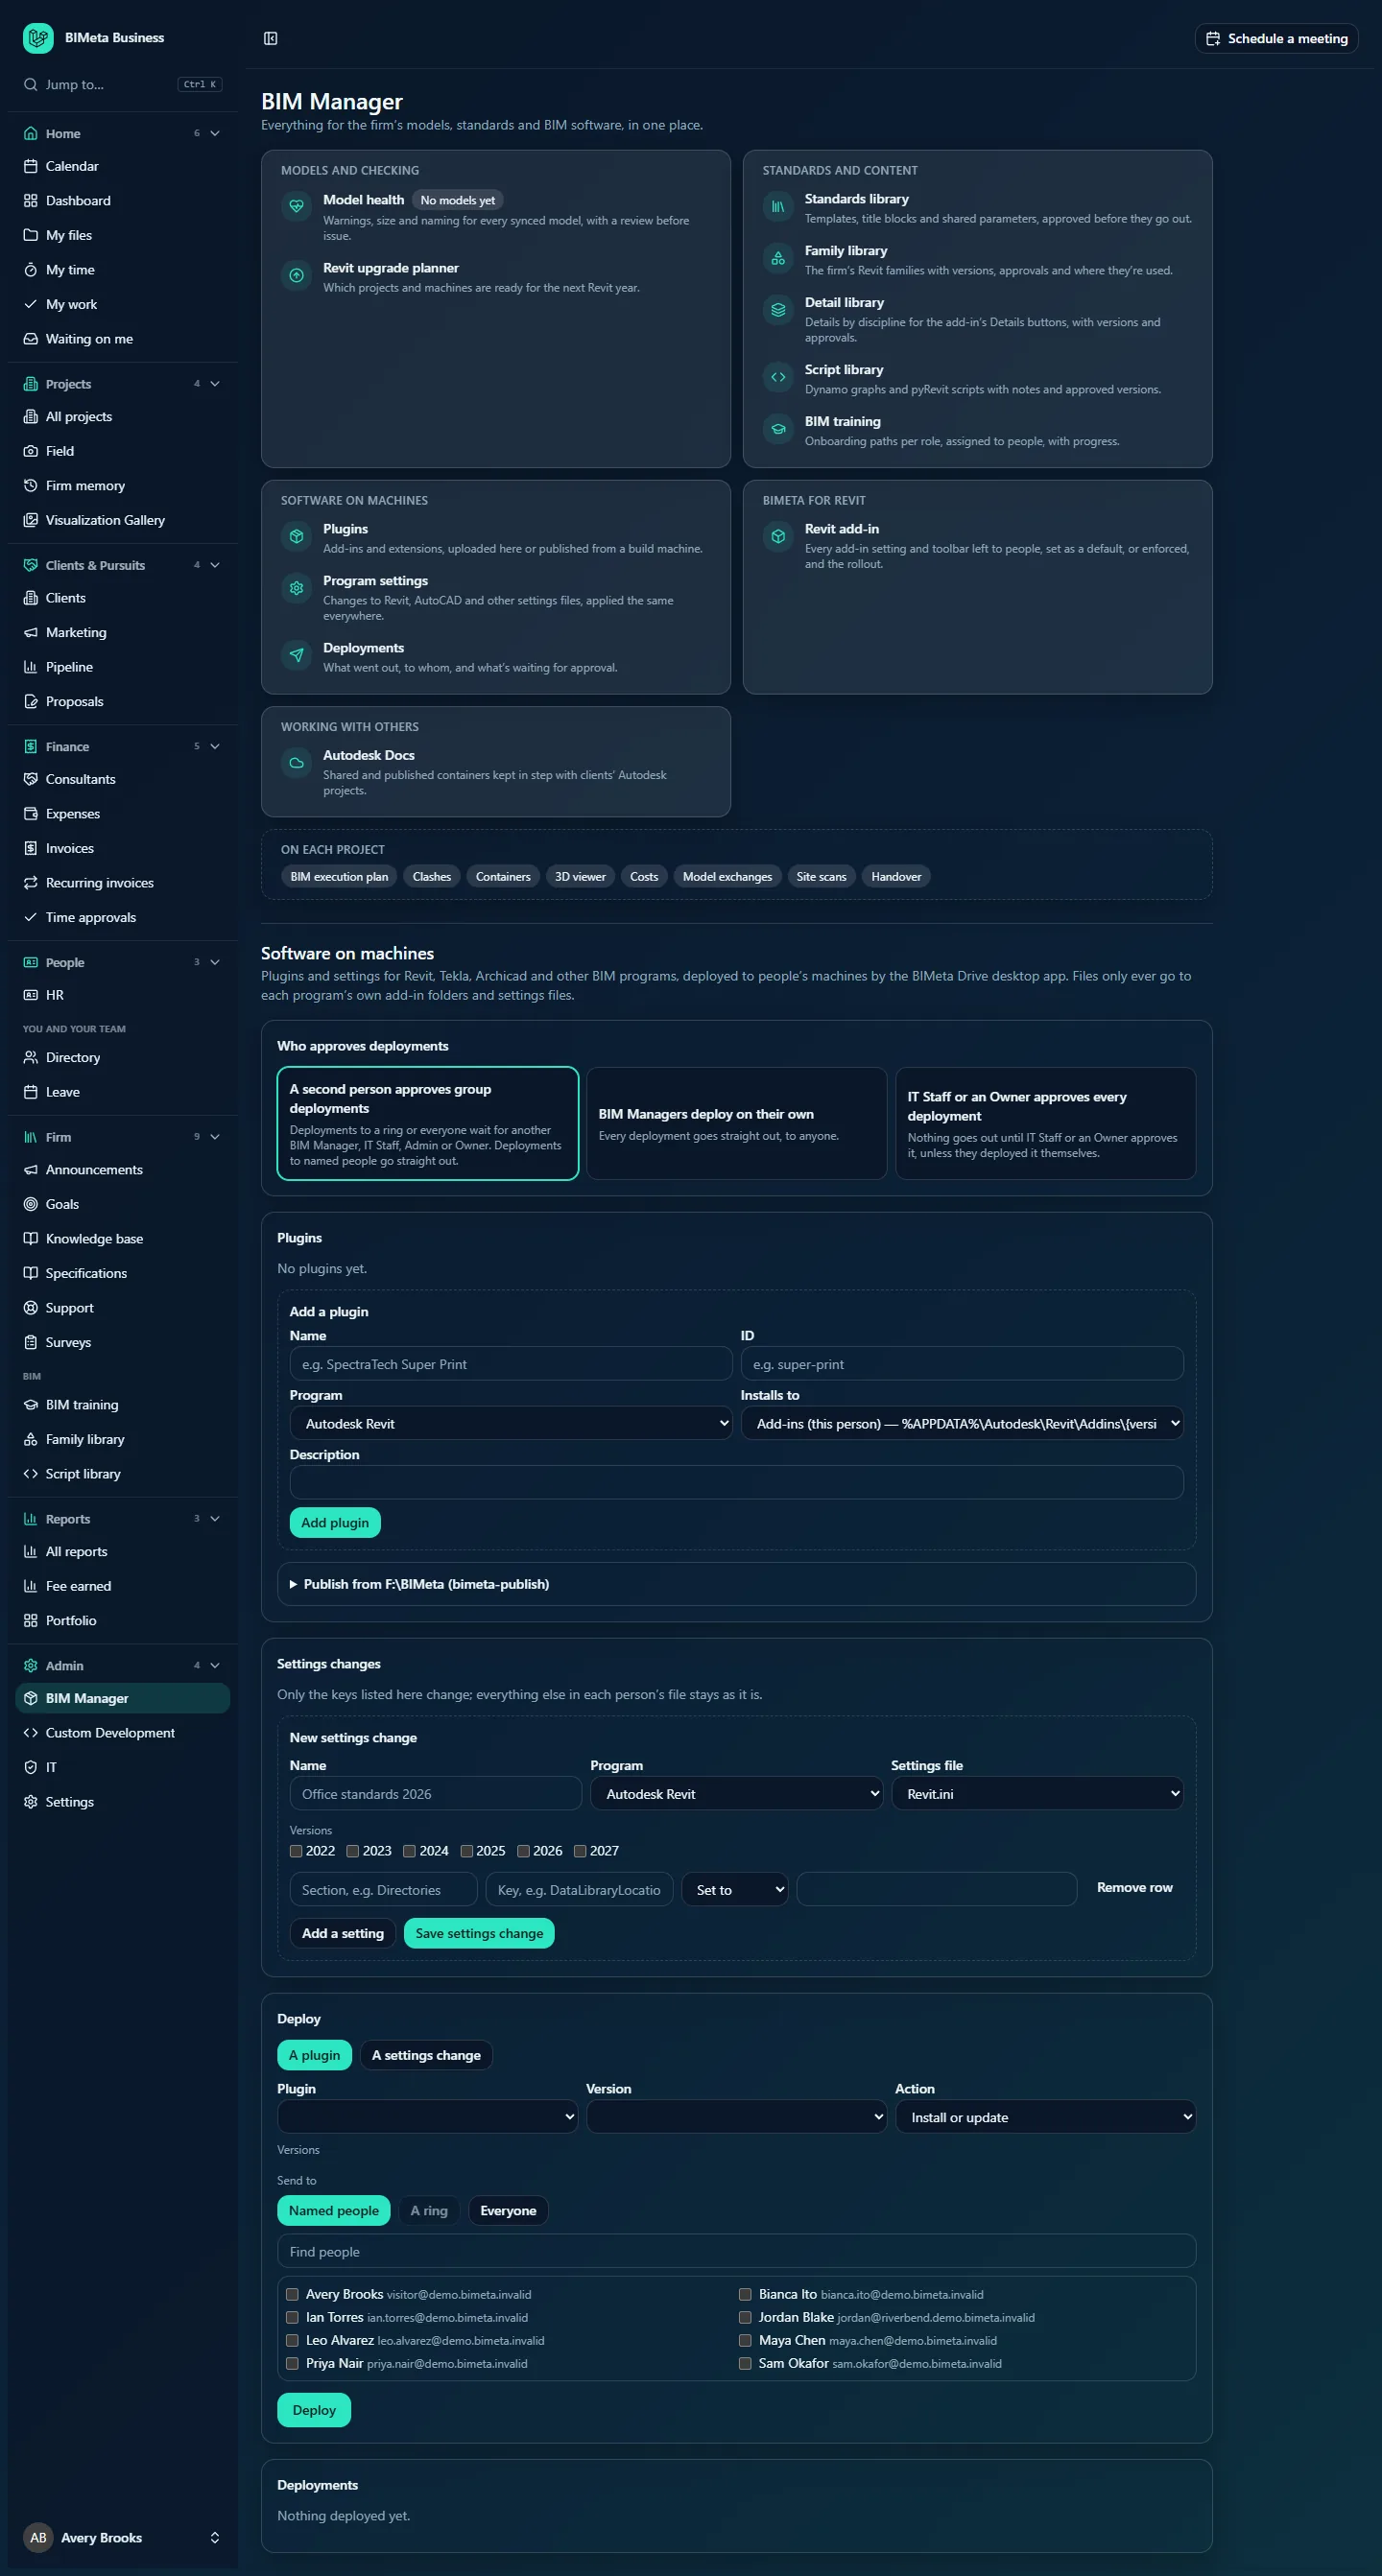
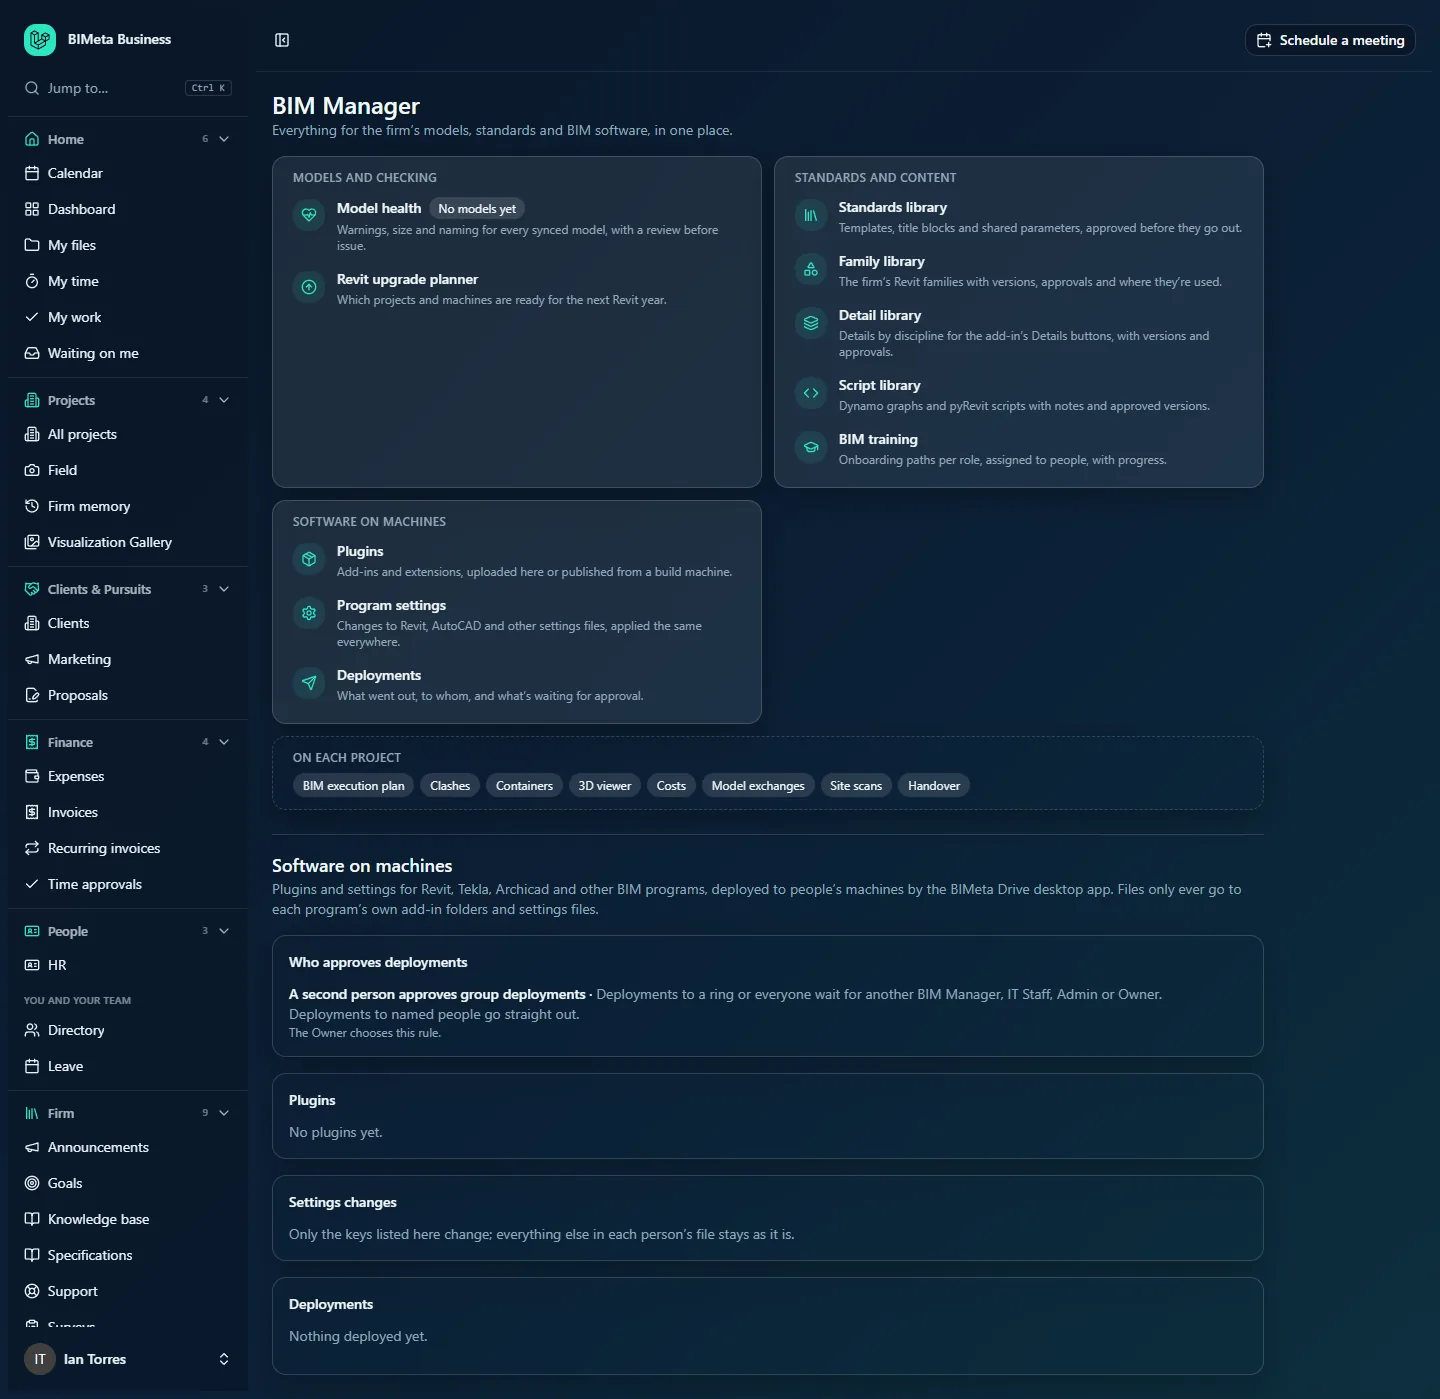
This is the panel as the Business Owner of the example firm Northlight Architects sees it, before any plugins have been added. IT Staff see a shorter version: the rule is shown as text, and the add and deploy forms are missing:
A tour of the page
Header
BIM Manager, with the line "Everything for the firm's models, standards and BIM software, in one place."
Tool cards
The tools are grouped into cards. Each tool shows an icon, its name, a one-line description and, where it helps, a small live count. A count in red means something needs your attention. You only see tools you're allowed to open, and a card disappears if none of its tools apply to you.
- Models and checking
- Model health: warnings, size and naming for every synced model, with a review before issue. Its count reads No models yet, N not ready to issue (red), N need attention (red) or N models, all healthy. See Model health: check every synced Revit model.
- Revit upgrade planner: which projects and machines are ready for the next Revit year. See Revit upgrade planner.
- Standards and content
- Standards library: templates, title blocks and shared parameters, approved before they go out. Shows N to approve in red when versions are waiting.
- Family library: the firm's Revit families with versions, approvals and where they're used (shows N families).
- Detail library: details by discipline for the add-in's Details buttons (shows N details).
- Script library: Dynamo graphs and pyRevit scripts with notes and approved versions.
- BIM training: onboarding paths per role, assigned to people, with progress.
- Software on machines: shortcuts that scroll down this page.
- Plugins: add-ins and extensions, uploaded here or published from a build machine (shows N plugins).
- Program settings: changes to Revit and other programs' settings files, applied the same everywhere.
- Deployments: what went out, to whom, and what's waiting for approval. Shows N waiting for approval in red.
- BIMeta for Revit
- Revit add-in: every add-in setting and toolbar left to people, set as a default, or enforced, and the rollout. Shows N people signed in once people use it. See Revit add-in: managed settings, toolbars and rollout.
- Working with others
- Autodesk Docs: shared and published containers kept in step with clients' Autodesk projects. Shows Connected, or Needs reconnecting in red. See Autodesk Docs: sync containers with client projects.
- On each project (dashed box): a reminder of the BIM tabs inside every project: BIM execution plan, Clashes, Containers, 3D viewer, Costs, Model exchanges, Site scans and Handover. These are labels only; open a project to use them.
Software on machines
Below a divider, this section explains: plugins and settings for Revit, Tekla, Archicad and other BIM programs are deployed to people's machines by the BIMeta Drive desktop app, and files only ever go to each program's own add-in folders and settings files. It has five cards.
Who approves deployments
The rule that decides whether a deployment goes out straight away or waits for a second person. There are three rules:
| Rule | What it means |
|---|---|
| A second person approves group deployments (the default) | Deployments to A ring or Everyone wait for another BIM Manager, IT Staff, Admin or Owner. Deployments to Named people go straight out. |
| BIM Managers deploy on their own | Every deployment goes straight out, to anyone. |
| IT Staff or an Owner approves every deployment | Nothing goes out until IT Staff or an Owner approves it, unless they deployed it themselves. |
The Business Owner sees the three rules as buttons, with the current one highlighted. Everyone else sees the current rule as text, followed by "The Owner chooses this rule." Whatever the rule, nobody can approve their own deployment.
Plugins
The firm's plugin library. Each plugin is one add-in or extension for one program. Until you add one, the card says No plugins yet. Each plugin row shows:
- The plugin's name, a badge with its program (for example Autodesk Revit) and a Latest badge with its newest version number.
- A grey line with where it installs (the install location's name and the folder it maps to) and the plugin's ID.
- Versions (or Hide): opens the version list. Each version shows its number, file size, whether it was uploaded in the panel or published from a build machine, the date and time, who added it, the first part of its checksum (a fingerprint that proves the file wasn't changed), and any notes. If you can manage plugins, an upload form appears under the list.
If you can manage plugins you also see the Add a plugin form and, under it, a collapsed bimeta-publish help section (see "How to publish versions from a build machine" below).
Settings changes
Saved changes to programs' settings files. The card reminds you: "Only the keys listed here change; everything else in each person's file stays as it is." Each saved change shows its name, a program badge, a settings file badge (for example Revit.ini), the program versions it applies to, and the list of changes as [Section] Key = value (or [Section] Key — removed). People who can edit settings see Edit and Delete, and the New settings change form.
Deploy
Shown only to people who can deploy. Two buttons pick what to send: A plugin or A settings change. The fields are described in "How to deploy" below. Send to offers Named people (with a Find people search box and a checklist of every active person with their email), A ring (a saved group of people, used for pilot-first rollouts; greyed out if your firm has no rings) and Everyone.
Deployments
The 40 most recent plugin and settings deployments, newest first. Until something goes out it says Nothing deployed yet. Each row shows:
- A Plugin or Settings badge and the title: the plugin's name and version (with "(remove)" for a removal), or the settings change's name.
- The program, its versions, who deployed it and when.
- A status badge: Waiting for approval, Going out or Cancelled.
- Progress counts per machine owner: waiting, received, postponed, done and failed (for example "3 done · 1 waiting").
- Approve: shown on deployments waiting for approval if you can approve and you didn't create it.
- Cancel: shown on deployments waiting or going out, if you can deploy.
How to add a plugin
- In the Plugins card, find Add a plugin.
- Name (required, up to 160 characters): the name people recognise.
- ID (required): a short permanent ID of 2 to 80 lowercase letters, numbers and dashes, starting with a letter or number, for example
sheet-tools. It must be unique and can't be changed later, so choose carefully. The publish command uses it to find the plugin. - Program: Autodesk Revit, Autodesk AutoCAD, Autodesk Civil 3D, Autodesk Navisworks, Tekla Structures, Graphisoft Archicad, Rhino and Grasshopper, SketchUp or Vectorworks.
- Installs to: where the files land on each machine. The choices depend on the program and each one shows the folder it maps to. For Revit: Add-ins (this person), Add-ins (everyone on the machine) or pyRevit extensions. For AutoCAD and Civil 3D: Plug-in bundles (this person) or (everyone on the machine). Navisworks: Plug-in bundles (everyone on the machine). Tekla Structures: Extensions. Archicad: Add-Ons. Rhino: Rhino packages or Grasshopper libraries. SketchUp: Extensions. Vectorworks: Plug-ins (this person). Folders that hold firm standards are never offered here; those belong to the Standards library.
- Description (optional, up to 1,000 characters).
- Click Add plugin. You'll see "Plugin added. Upload its first version, or publish one with bimeta-publish." The plugin appears in the list, and the action is recorded in the audit log.
How to upload a version
- On the plugin's row, click Versions.
- Version (required): up to 40 letters, numbers, dots, dashes, underscores or plus signs, for example
1.0.0. Each number can be used only once per plugin; to change a release, publish a new number. - .zip (required, up to 512 MB): the plugin's files, zipped as they should appear inside the install folder. The zip must open, hold between 1 and 5,000 files, unpack to no more than 2 GB, and use relative paths only (no drive letters, no paths starting with a slash, no ".."). That rule guarantees nothing can be written outside the add-in folder.
- Notes (optional, up to 2,000 characters): what changed.
- Click Upload version. You'll see "Version … added to the library." Files are stored encrypted like every other firm file, and the upload is recorded in the audit log. Uploading doesn't send anything to machines; deploy it next.
How to publish versions from a build machine
Instead of uploading by hand, a developer or BIM Manager can publish new versions straight from the machine where the plugin is built. Open the collapsed bimeta-publish help section under Add a plugin for the exact command to run. In outline:
- Get a firm API key with the Publish BIM plugin versions (bimeta-publish) scope. API keys are created under Admin → Settings → Developers, and the key's owner must be someone allowed to add BIM plugins (usually the Business Owner).
- Store the key in an environment variable on the build machine, never in a file you share or check in.
- Run the publish command shown in the help section, giving your firm's portal address, the folder to publish, the plugin's ID and the new version number. The first time, also give the plugin's name, program and install location: if the ID doesn't exist yet, publishing creates the plugin for you.
- The command zips the folder, uploads it as a new version and prints its checksum. The version appears in the panel marked published, under the API key owner's name.
The same checks apply as for uploads (unique version number, size and zip rules). The BIMeta add-in for Revit is published this way too, as one plugin per Revit year; see Revit add-in: managed settings, toolbars and rollout.
How to create a settings change
A settings change sets or removes specific keys in a program's settings file on everyone's machine, for example pointing every Revit installation at the firm's library folders. Only Revit (Revit.ini) and Tekla Structures (user.ini (advanced options)) settings files can be changed.
- In Settings changes, use the New settings change form.
- Name (required, up to 160 characters), for example Office standards 2026.
- Program and Settings file.
- Versions: tick every program version it applies to (for Revit 2022 to 2027). At least one is required.
- For each setting, fill in a row: Section (for example
Directories), Key (for exampleDataLibraryLocations), choose Set to and type the value, or choose Remove to delete the key (the value box is then disabled). Use Add a setting for more rows and Remove row to drop one. Blank rows are ignored. - Click Save settings change. You'll see "Settings change saved."
Rules: 1 to 200 settings per change; sections and keys up to 120 characters, each on one line, no square brackets in the section and no "=" in the key; values up to 1,000 characters on one line. If a row breaks a rule, the message names the row number.
To change a saved one, click Edit, adjust it and click Save settings change (or Cancel). Delete removes it from the list straight away, without a confirmation. Saving, editing and deleting are recorded in the audit log. Editing or deleting doesn't touch machines that already received it; deploy again to send the new version.
How to deploy
- In Deploy, choose A plugin or A settings change.
- For a plugin, choose:
- Plugin and Version (the newest is selected for you).
- Action: Install or update, or Remove to take the plugin off people's machines.
- Versions: tick the program versions to install it for (for example Revit 2025 and 2026). At least one is required, even for install locations shared by every version.
- Send to:
- Named people: tick people in the list; type in Find people to filter by name or email.
- A ring: choose a ring from the list.
- Everyone: every active person in the firm at the moment you deploy.
- Click Deploy. Depending on the approval rule you'll see either "Deployment sent. Machines pick it up the next time they check in." or "Deployment created. It goes out once it's approved."
The BIMeta Drive desktop app on each person's computer checks for work, downloads the file, verifies its checksum and installs it only into the fixed folder for that program and version. The app has its own copy of the allowed folders and refuses anything else. Only people with a live deployment of that exact version can download it.
How to approve or cancel a deployment
- Open the BIM Manager panel. The Deployments tool card shows how many are waiting.
- In the Deployments list, find the row marked Waiting for approval, check what it is, which program versions and who it's for.
- Click Approve. You'll see "Approved. Machines pick it up the next time they check in." The status changes to Going out and the approval is recorded in the audit log.
- To stop a deployment that's waiting or going out, click Cancel. Machines that haven't picked it up won't get it; machines that already installed it keep it (deploy a Remove to take it off).
How the Owner sets the approval rule
- As the Business Owner, open Admin → BIM Manager and scroll to Who approves deployments.
- Click the rule you want. It's saved immediately ("Approval rule saved."), highlighted, recorded in the audit log, and applies to every deployment created from then on.
Tips and good to know
- Test on yourself first. Deploy to yourself as a named person, check the program, then go to a pilot ring, then everyone.
- Everyone is a snapshot. People who join later don't get earlier deployments automatically; deploy to them by name.
- Staff need BIMeta Drive signed in on their computer to receive anything. IT Staff can check machines under Admin → IT, Devices tab.
- Removing a plugin from machines is a deployment with the Remove action, under the same approval rule.
- Plugin versions feed the Revit upgrade planner's compatibility table, and firm standards (templates, title blocks, shared parameters) are deployed from the Standards library through the same rollout and approvals.
- There's no way to rename a plugin's ID or delete a plugin version in the panel. Pick IDs carefully and use new version numbers for fixes.
Troubleshooting / FAQ
Why is my deployment waiting?
Under the default rule, deployments to a ring or everyone wait for a second person. Under IT Staff or an Owner approves every deployment, everything waits unless IT Staff or an Owner created it. Ask another approver; you can't approve your own.
Why don't I see an Approve button?
Either you created the deployment, or you don't have approval rights. If you're a BIM Manager and the rule is IT Staff or an Owner approves every deployment, clicking Approve shows "Under your firm's rule, IT Staff or an Owner approves BIM deployments."
Why is "A ring" greyed out?
Your firm has no rings yet. Deploy to named people or everyone in the meantime.
My upload was refused because of a file "outside its own folder".
The zip contains an absolute path or "..". Re-zip the plugin's folder contents with relative paths only.
A person didn't get the plugin.
Check the counts on the deployment row. "waiting" means their computer hasn't checked in yet (BIMeta Drive must be running and signed in); "failed" means the install failed on that machine.
Was this article helpful?
Share