


Setup step 11: project folders & app bindings
18 views · by Kevin J Bruno · updated 1 day ago
Step 11 of setup, Project folders & app bindings, the last step of the Project standards section, sets the folder tree that every new project gets automatically in its Files tab, so everyone files things in the same place on every project. Folders can also be bound to an application: the Revit folder is where Revit models go, Issued Sets is where Super Print output goes, and so on. BIMeta's desktop tools use these bindings to know where their files belong.
Where to find it
Sidebar → Admin → Settings → Firm setup → Setup → 11. Project folders & app bindings. Above the title it shows Project standards · Step 11 of 13. The page has a Settings back link at the top that returns you to the Settings page.
Who can use it
Business Owners and Admins.
A tour of the page
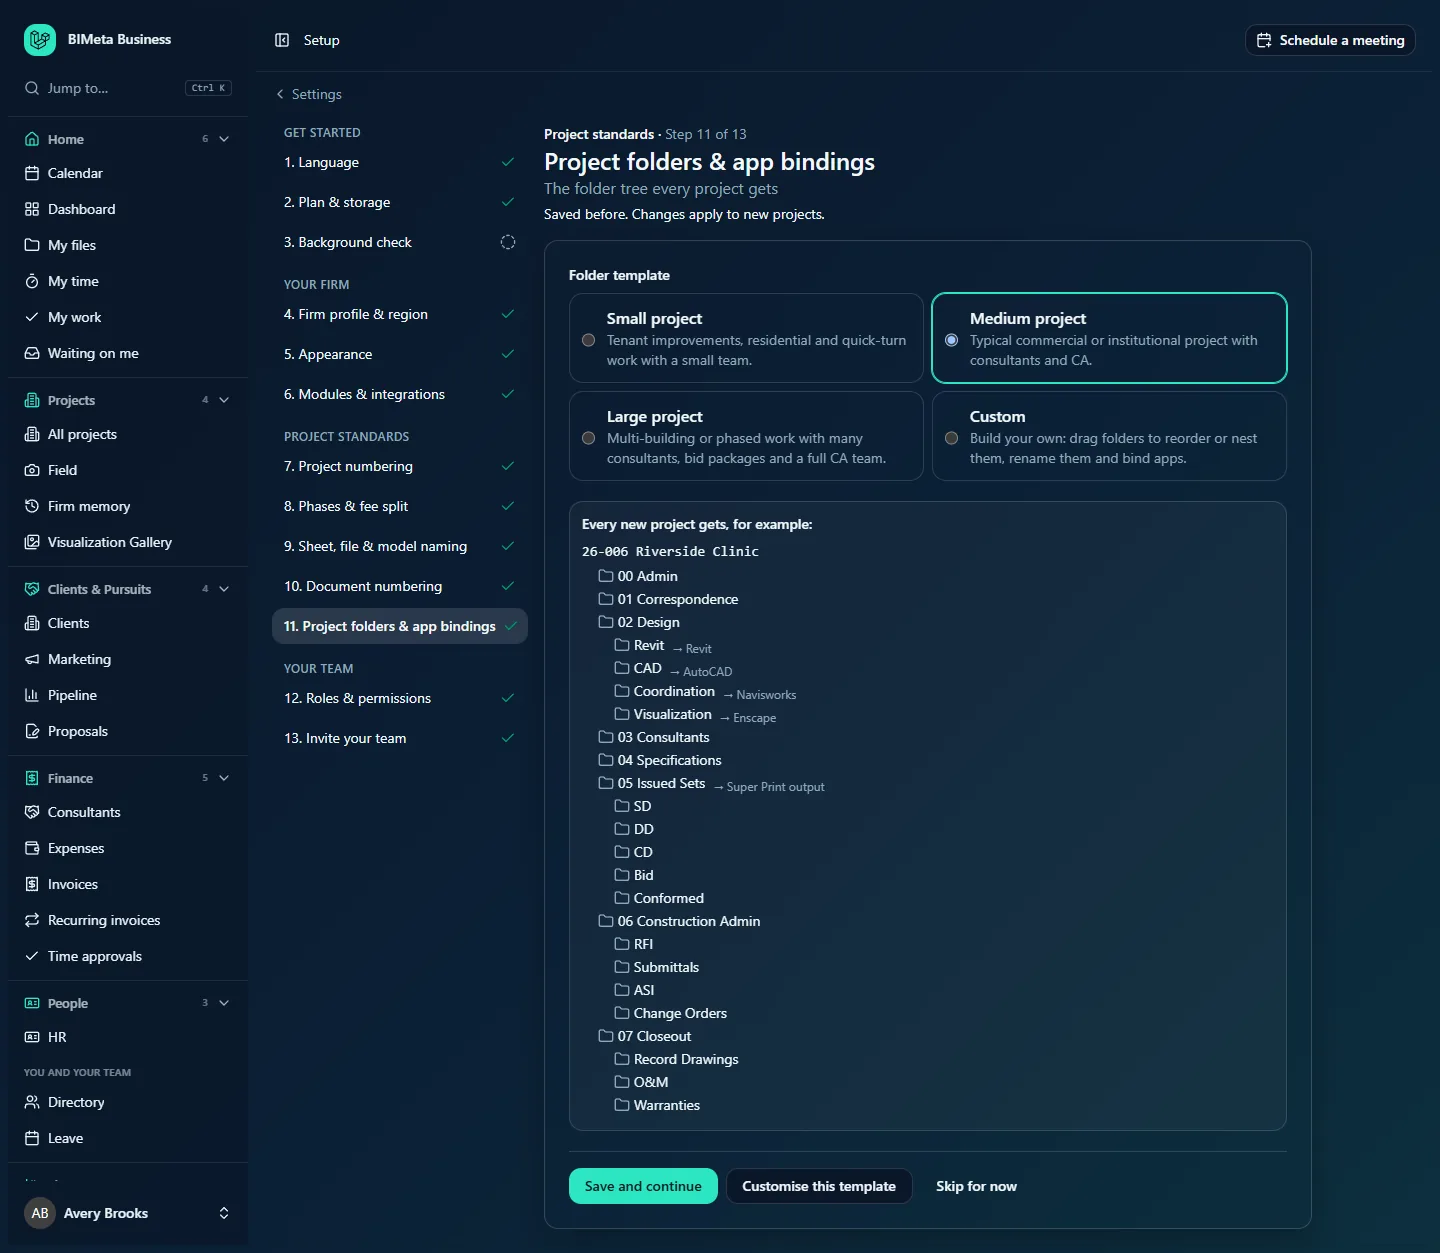
Folder template
Four choices, each with a description:
- Small project: tenant improvements, residential and quick-turn work with a small team. Five folders: 00 Admin, 01 Correspondence, 02 Design (with Revit and CAD), 03 Issued Sets, 04 Closeout.
- Medium project (the default): typical commercial or institutional work with consultants and CA. 00 Admin, 01 Correspondence, 02 Design (Revit, CAD, Coordination, Visualization), 03 Consultants, 04 Specifications, 05 Issued Sets (SD, DD, CD, Bid, Conformed), 06 Construction Admin (RFI, Submittals, ASI, Change Orders) and 07 Closeout (Record Drawings, O&M, Warranties).
- Large project: multi-building or phased work with many consultants, bid packages and a full CA team. Adds subfolders such as Contracts, Proposals, Invoices and Insurance under Admin; Client, Consultants and Authorities under Correspondence; Central Models, Links and Families under Revit; Clash Reports, Renderings, Animations and Markups; consultant folders per discipline; issued sets from SD to Conformed; a Bidding folder; a full CA set (RFI, Submittals, ASI, PR, Change Orders, Site Reports, Pay Apps, Punch List); and Lessons Learned at closeout.
- Custom: build your own.
Preview
For the three ready-made templates, a box shows Every new project gets, for example:, a sample project name using your project number pattern (for example 26-006 Riverside Clinic) and the full tree. Bound folders show their app after an arrow, for example Revit → Revit, CAD → AutoCAD, Coordination → Navisworks, Visualization → Enscape and 05 Issued Sets → Super Print output.
Buttons
Save and continue, Customise this template (switches to Custom, starting from the template you're looking at) and Skip for now.
How to build a custom folder tree
- Pick the template closest to what you want, then click Customise this template (or choose Custom).
- The editor shows each folder as a row with:
- Folder name: rename it in place.
- App for [folder]: bind it to Revit, AutoCAD, Navisworks, Enscape, Twinmotion, Bluebeam, Super Print output, BIMeta Blueprint or Microsoft 365, or No app.
- Buttons to move the folder up or down, put it inside the folder above, move it out one level, add a folder inside it, and remove it.
- Use Add a top-level folder for a new folder at the top level. New folders start as New folder.
- Click Save and continue.
Rules for a custom tree:
- At least one folder, up to 200 folders in all, nested up to 5 levels deep.
- Folder names need 1 to 60 characters and can't contain
\ / : * ? " < > |. - Two folders side by side can't have the same name.
Tips and good to know
- The tree is created when a project is created (including projects imported from CSV). Changing the template later doesn't add or remove folders in existing projects.
- Numbering top-level folders (00 Admin, 01 Correspondence…) keeps them in a fixed order everywhere.
- Bind only one folder per app where you can; it makes it obvious to the desktop tools where things go.
Troubleshooting
"Two folders side by side are both called …"
Rename one of them. The same name is fine in different parent folders.
The "add a folder inside" button is greyed out.
That folder is already 5 levels deep, the maximum.
Using the recommended settings
If you never save this step, every new project gets the Medium project folder tree. During a new firm's guided onboarding, Use recommended settings on the Project standards introduction marks this step done with that default (see Guided onboarding: your firm's first sign-in). After this step, Save and continue moves on to the Your team section, starting with step 12, Roles & permissions.
Was this article helpful?
Share