Setup: get your portal ready (overview, language, plan and appearance)
21 views · by Kevin J Bruno · updated 6 days ago
Setup is the 13-step wizard that shapes BIMeta Business around your firm: the language it speaks, the plan and storage you pay for, the background check that opens a new portal, your offices and region, how the portal looks, how project and document numbers are built, your phases and fee split, sheet and file naming, the folder tree every project gets, and finally who has access. The steps are grouped in four sections: Get started, Your firm, Project standards and Your team.
A brand-new firm goes through Setup once, step by step, as part of its guided onboarding (see Guided onboarding: your firm's first sign-in). After that, Setup is a page you can come back to at any time to change a step. Nothing is forced: you can skip almost any step and return later.
This article covers the overview page, how the steps work, and steps 1 (Language), 2 (Plan & storage) and 5 (Appearance). Every other step has its own article, listed in the table below.
Where to find it
- Sidebar → Admin → Settings → Firm setup → Setup. The Setup page has a Settings back link at the top that returns you to the Settings page.
- Press Ctrl K and type setup, wizard or getting started.
- Until every step is done or skipped, a Finish setting up card on the Dashboard shows how many steps are left and links here.
- While your firm is still in its guided onboarding, opening Setup takes you to the onboarding welcome instead, which carries on from the first step you haven't finished.
Who can use it
- Business Owners and Admins (the permission Run setup and change firm settings).
- Step 2, Plan & storage, is the Business Owner's: only people who can manage billing can choose and pay for a plan. Admins see the current plan read-only.
- IT Staff, BIM Managers, Human Resources, Project Managers and Users don't see Setup on their Settings page and can't open it.
The overview page
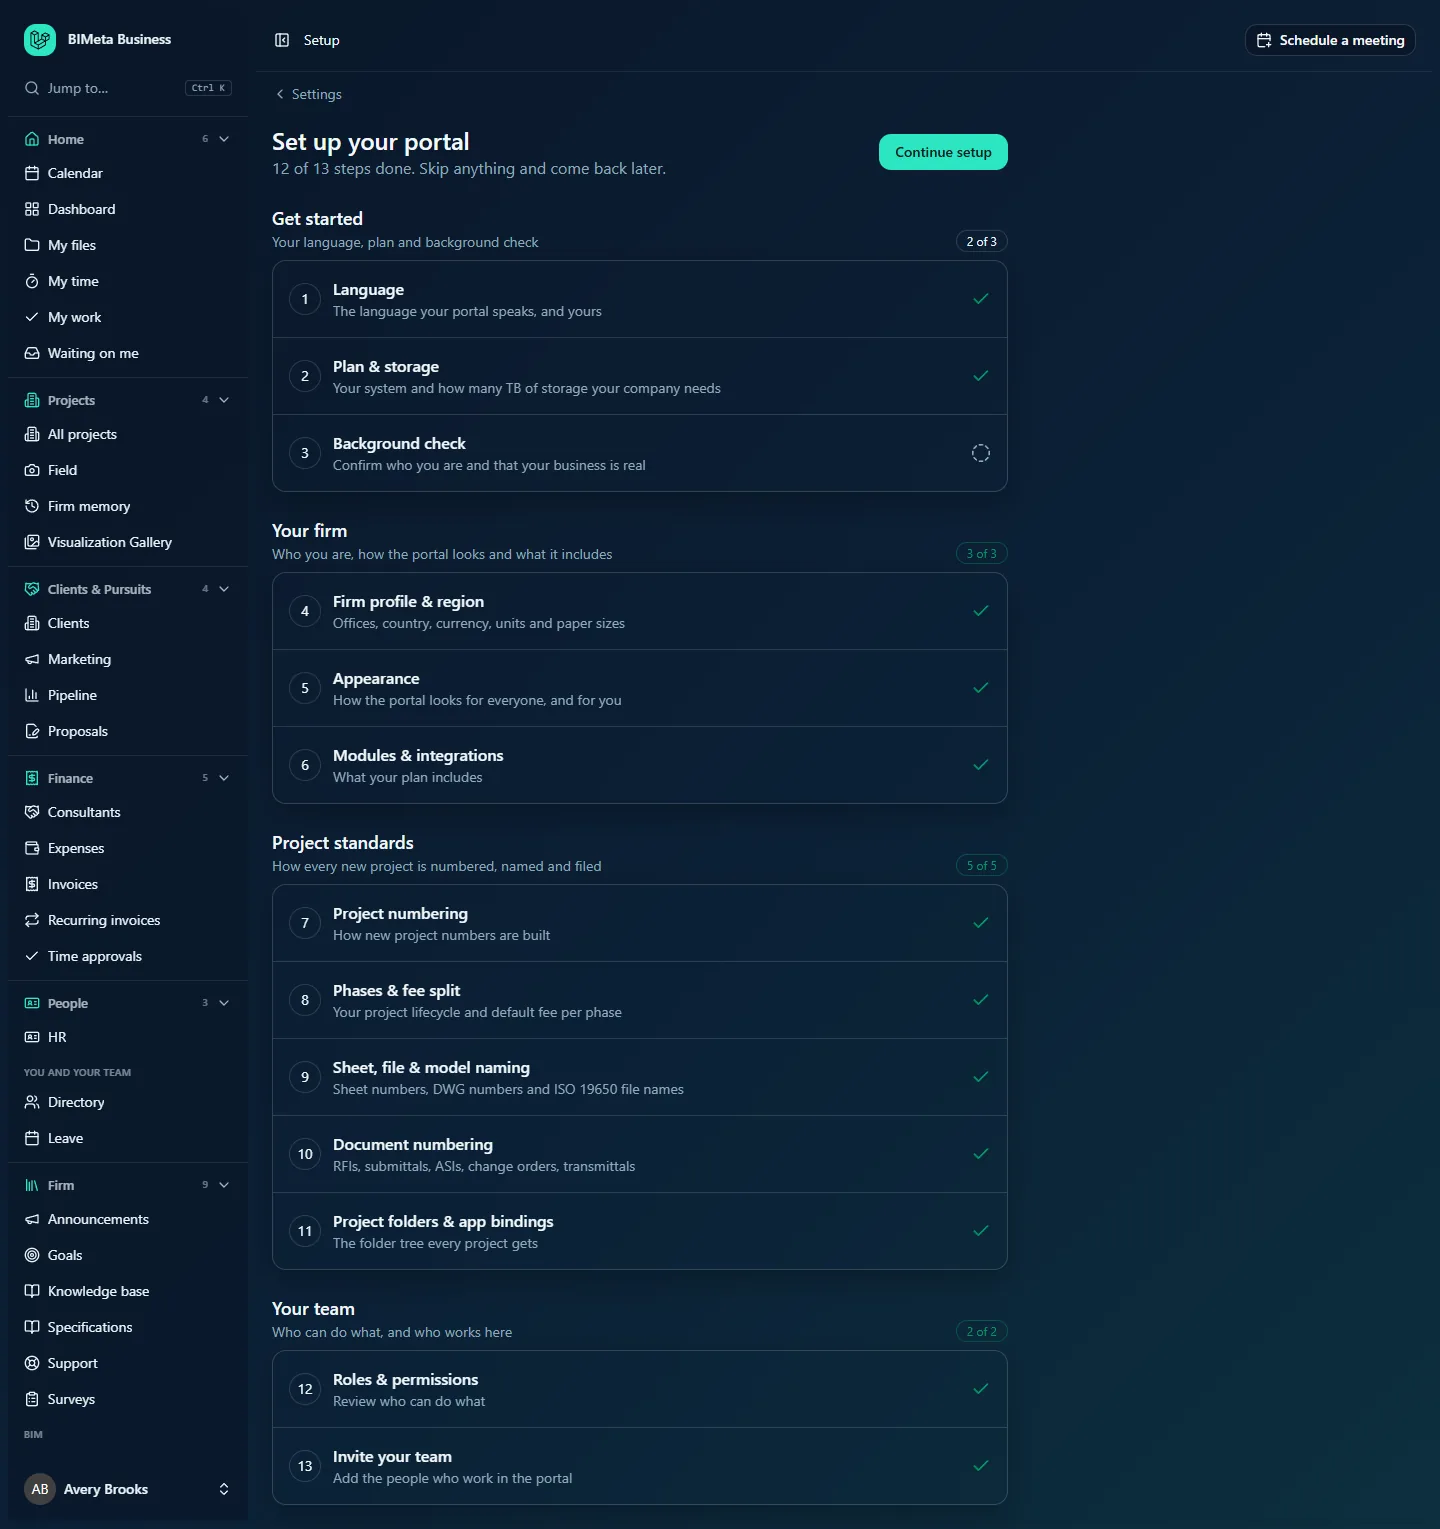
At the top is the title Set up your portal with a progress line, for example 12 of 13 steps done. Skip anything and come back later. The count includes only steps you saved; skipped steps don't count as done here. While any step is neither done nor skipped, a Continue setup button on the right opens the first of them.
Below, the 13 steps are shown in their four sections. Each section has a heading, a one-line description and a small counter on the right, for example 2 of 3, showing how many of its steps are done or skipped; the counter turns green when the whole section is through. In the example firm Northlight Architects, Get started shows 2 of 3 because the Background check isn't finished, while the other three sections are complete.
Each step row shows its number, name and description, and an icon on the right: a green tick (Done), a skip arrow (Skipped) or a dashed circle (Not started). Click any row to open that step.
| Section | Description on screen | Steps |
|---|---|---|
| Get started | Your language, plan and background check | 1 to 3 |
| Your firm | Who you are, how the portal looks and what it includes | 4 to 6 |
| Project standards | How every new project is numbered, named and filed | 7 to 11 |
| Your team | Who can do what, and who works here | 12 and 13 |
| # | Section | Step | What it sets | Article |
|---|---|---|---|---|
| 1 | Get started | Language | The language your portal speaks, and yours | This article |
| 2 | Get started | Plan & storage | Your system and how many TB of storage your company needs | This article |
| 3 | Get started | Background check | Confirm who you are and that your business is real | Setup step 3: Background check (verify your identity and business) |
| 4 | Your firm | Firm profile & region | Offices, country, currency, units and paper sizes | Setup step 4: firm profile & region |
| 5 | Your firm | Appearance | How the portal looks for everyone, and for you | This article |
| 6 | Your firm | Modules & integrations | What your plan includes | Setup steps 6, 12 and 13: modules, roles and inviting your team |
| 7 | Project standards | Project numbering | How new project numbers are built | Setup steps 7, 9 and 10: project numbering, naming and document numbering |
| 8 | Project standards | Phases & fee split | Your project lifecycle and default fee per phase | Setup step 8: phases & fee split |
| 9 | Project standards | Sheet, file & model naming | Sheet numbers, DWG numbers and ISO 19650 file names | Setup steps 7, 9 and 10: project numbering, naming and document numbering |
| 10 | Project standards | Document numbering | RFIs, submittals, ASIs, change orders, transmittals | Setup steps 7, 9 and 10: project numbering, naming and document numbering |
| 11 | Project standards | Project folders & app bindings | The folder tree every project gets | Setup step 11: project folders & app bindings |
| 12 | Your team | Roles & permissions | Review who can do what | Setup steps 6, 12 and 13: modules, roles and inviting your team |
| 13 | Your team | Invite your team | Add the people who work in the portal | Setup steps 6, 12 and 13: modules, roles and inviting your team |
How every setup step works
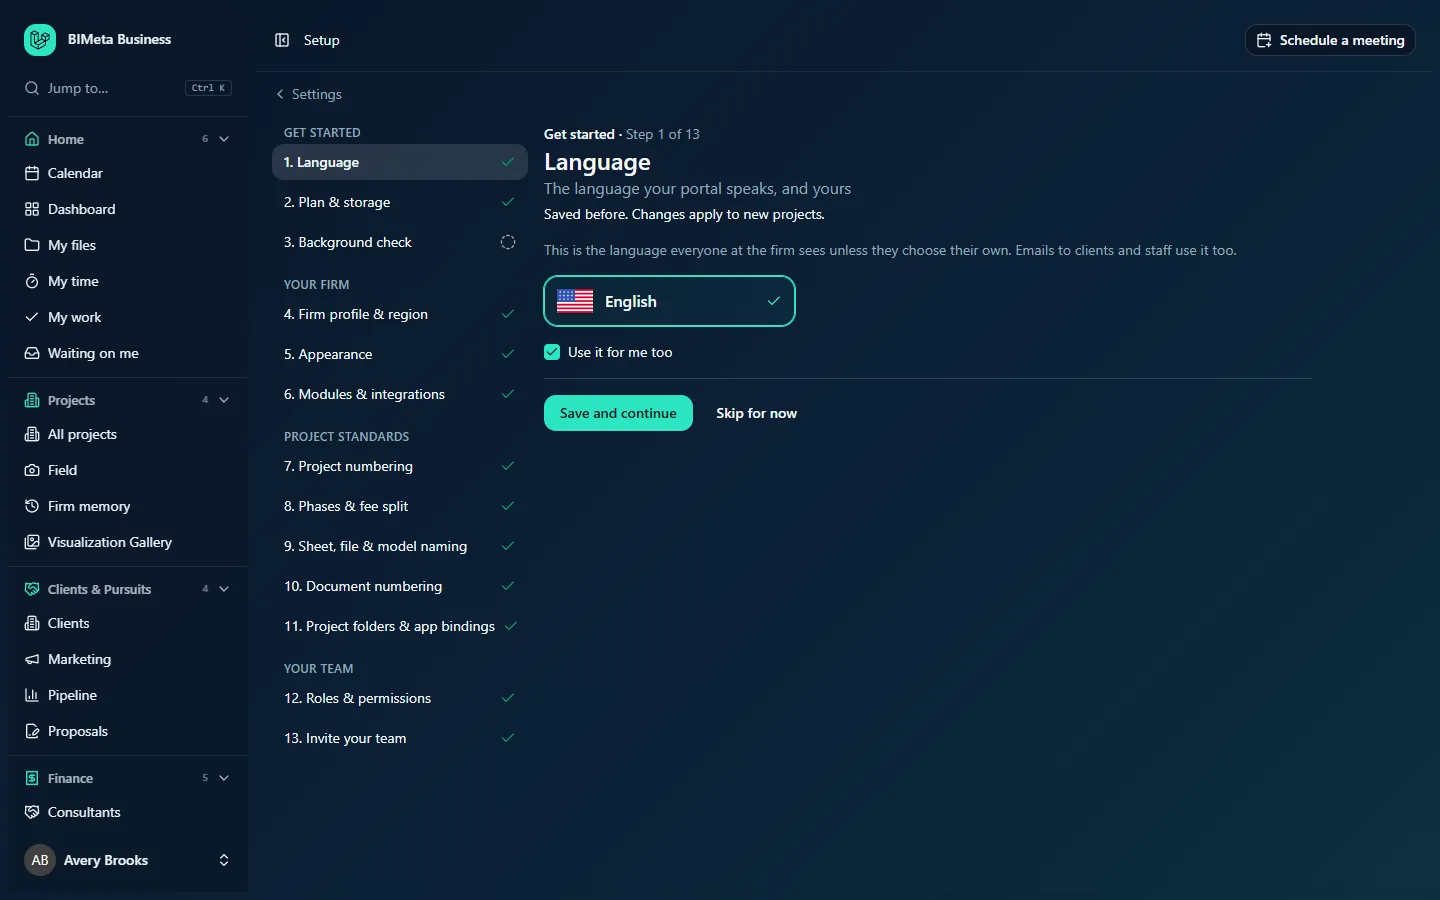
- The left column lists all 13 steps under their section headings (GET STARTED, YOUR FIRM, PROJECT STANDARDS, YOUR TEAM), each with the same done, skipped or not-started icon as the overview. Click any step to jump there; the step you're on is highlighted. On a narrow screen the list scrolls sideways across the top.
- Above the title you see the section and position, for example Get started · Step 1 of 13, then the step's name and a one-line description.
- If you've been here before, a line says Saved before. Changes apply to new projects. or Skipped earlier.
- Save and continue saves the step, marks it done and takes you to the next one, with a message such as Language saved.
- Skip for now marks the step skipped without saving anything and moves on (… skipped. You can come back to it any time.). The Background check step is the exception: while a new firm's portal is waiting for its checks, it can't be skipped.
- After step 13 you return to the overview with Setup finished. You can change any step here later.
- Every save is written to the Audit log as
settings.setup_savedwith the step's name.
During a new firm's guided onboarding the same step pages look a little different: there's no sidebar and no step list, a progress bar runs across the top, and you can't jump ahead of the first unfinished step. Each new section also opens with a short introduction. See Guided onboarding: your firm's first sign-in.
Step 1: Language
The language everyone at the firm sees unless they choose their own; emails to clients and staff use it too. The page shows one tile per language your platform offers, with its flag and its own name (for example English); the chosen one has a tick.
- Click the language your firm works in.
- Leave Use it for me too ticked to switch your own portal to it as well; untick it to keep your personal language.
- Click Save and continue.
Each person can still choose their own language in their personal settings. To change individual words rather than the whole language, use Admin → Settings → Wording.
Step 2: Plan & storage
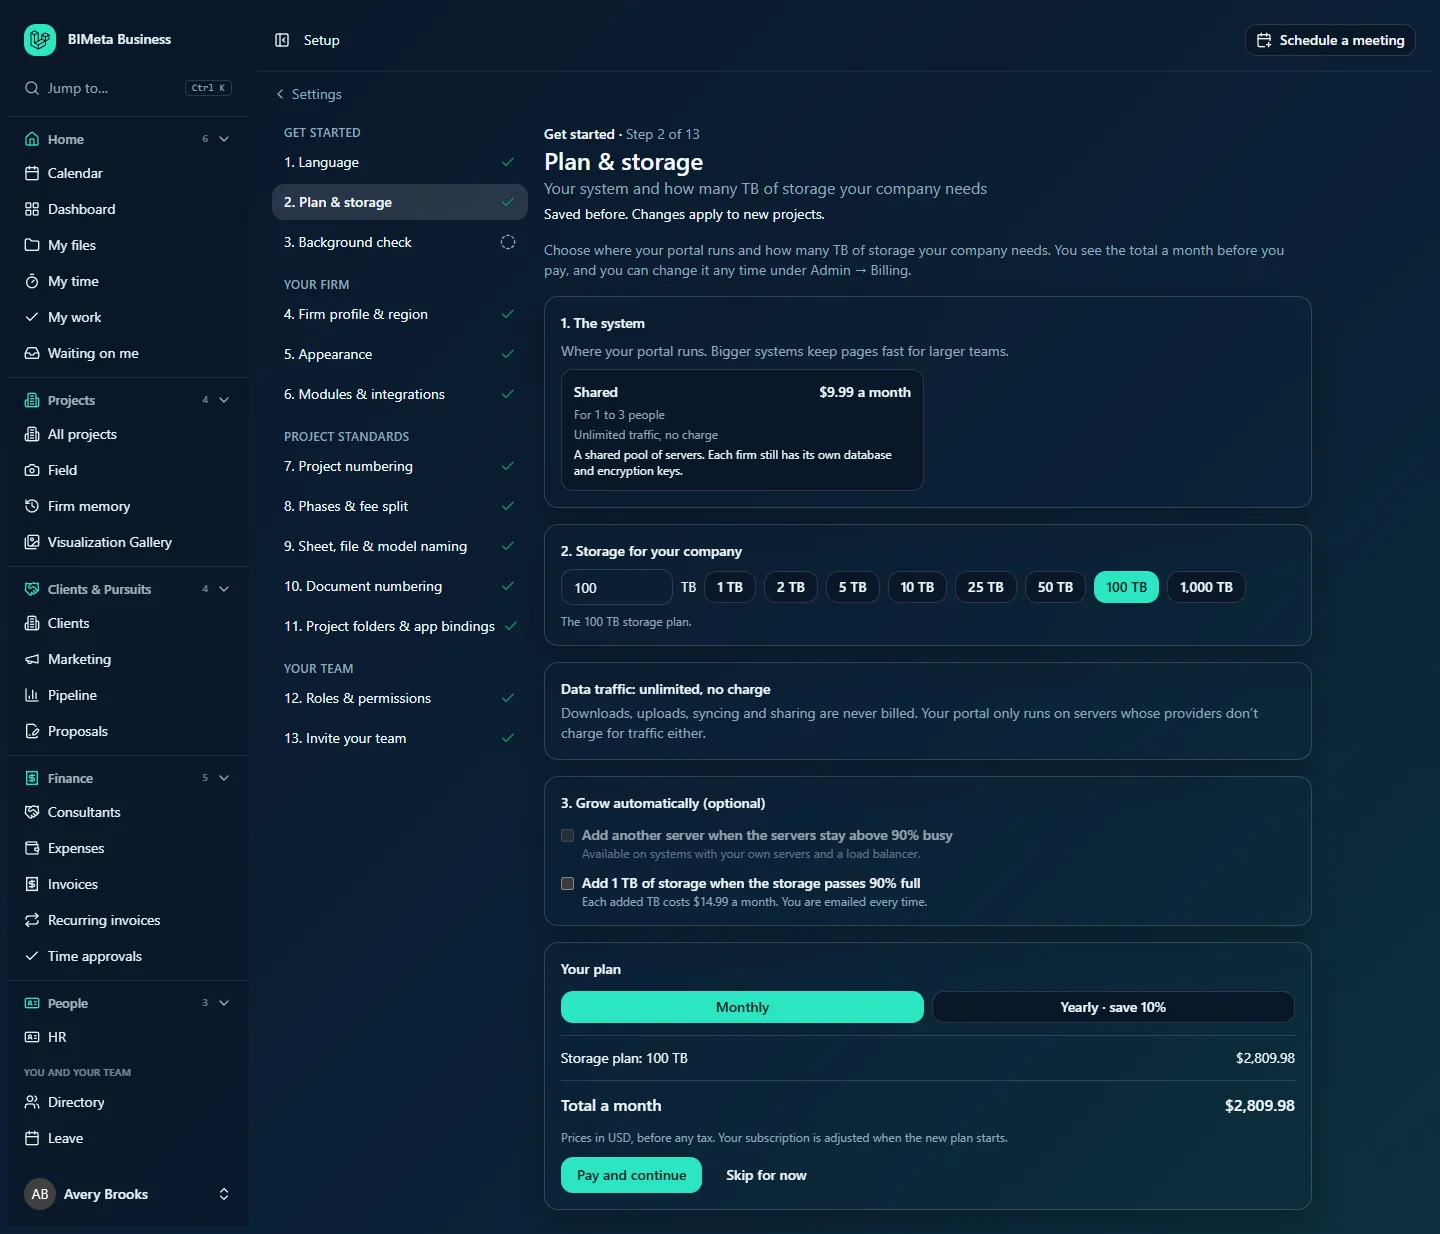
Where your portal runs and how much storage the firm has. You see the total before you pay, and you can change it any time under Admin → Settings → Billing & storage (see Build your plan: choose your system, storage and automatic growth for full detail). The step has these parts:
- 1. The system: the kind of servers your portal runs on. Each option shows its price a month (or Included), how many people it suits (for example For 1 to 3 people), that traffic is unlimited and free, and a short description. Shared, for example, is A shared pool of servers. Each firm still has its own database and encryption keys. Systems with your own servers also say so, show how long they take to be ready, and let you choose the Location of your servers, add More locations and choose how people reach them. Which systems you're offered depends on your plan.
- 2. Storage for your company: type the number of terabytes, or click a size button (1, 2, 5, 10, 25, 50, 100 or 1,000 TB). The line below names the matching storage plan, for example The 100 TB storage plan.
- Data traffic: unlimited, no charge: downloads, uploads, syncing and sharing are never billed.
- 3. Grow automatically (optional): Add another server when the servers stay above 90% busy (only on systems with your own servers and a load balancer) and Add 1 TB of storage when the storage passes 90% full (each added TB is charged monthly and you're emailed every time).
- Your plan: choose Monthly or Yearly · save 10%, see each line and the Total a month (or a year). Prices are in US dollars before any tax.
Click Pay and continue to order it. If payment is needed you go to the secure checkout and, once paid, come back to step 3, Background check. If you cancel at checkout you return to this step with The payment was cancelled, so nothing changed. If no payment is needed (for example you already have a subscription), the change applies straight away and you move on. The order is recorded in the Audit log as billing.plan_ordered. Skip for now moves on without changing your plan.
Admins see only Only the Owner chooses the plan and storage. Right now the firm has [n] TB of storage · [system]. and a Continue button.
Step 3: Background check
New firms confirm the Owner's identity and that the business is real before the portal opens. This step is explained in full in Setup step 3: Background check (verify your identity and business). If your firm doesn't need a check, the step just says Your firm doesn't need a background check. with a Continue button.
Step 5: Appearance
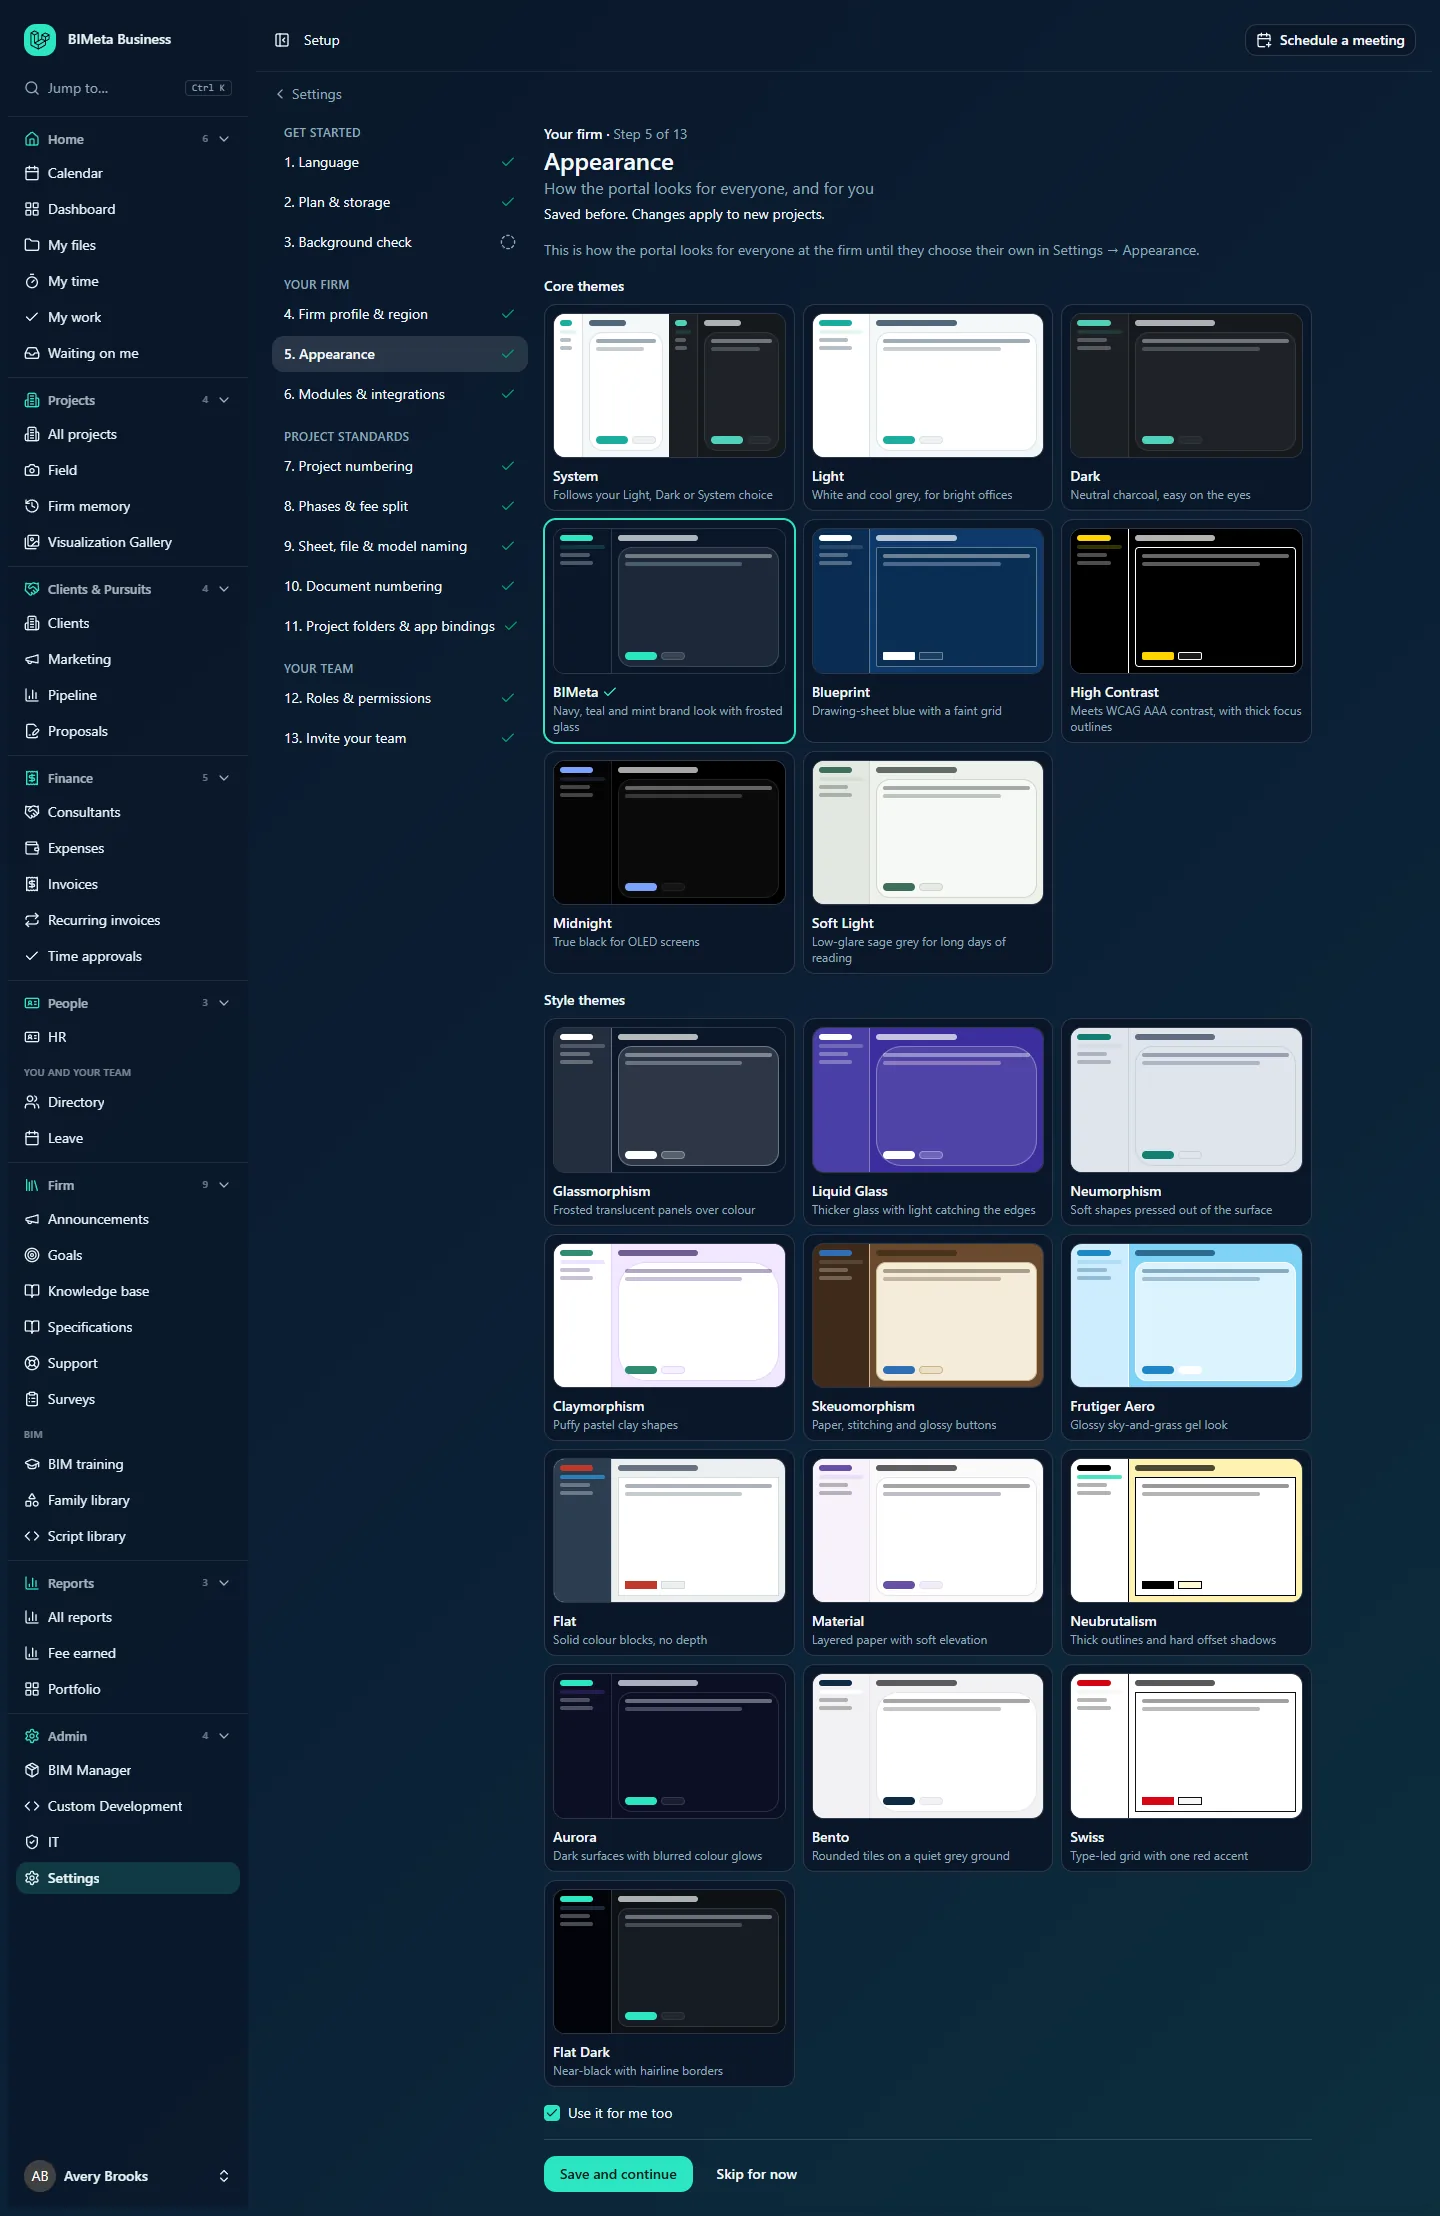
The look everyone at the firm gets until they choose their own in their personal settings (click your name at the bottom of the sidebar, then Settings → Appearance). Clicking a theme previews it immediately on your screen.
- Core themes: System (follows each person's light or dark computer setting), Light, Dark, BIMeta (navy, teal and mint with frosted glass; Northlight's choice), Blueprint (drawing-sheet blue with a faint grid), High Contrast (meets WCAG AAA contrast, with thick focus outlines), Midnight (true black for OLED screens) and Soft Light (low-glare sage grey for long reading days).
- Style themes: Glassmorphism, Liquid Glass, Neumorphism, Claymorphism, Skeuomorphism, Frutiger Aero, Flat, Material, Neubrutalism, Aurora, Bento, Swiss and Flat Dark. Each tile has a one-line description.
- Click a theme.
- Leave Use it for me too ticked to use it yourself as well.
- Click Save and continue. You move on to step 6, Modules & integrations.
The firm's theme is also what new people see on their invitation page, where they can pick their own.
Tips and good to know
- Most settings in Setup apply to new projects and documents. Existing projects keep their numbers and folders.
- Finish step 4 (region) and the Project standards section (steps 7 to 11) before you create or import projects: project numbers and folders are made when a project is created.
- The Project standards steps all start with sensible defaults for your country. Even if you skip them, those defaults apply; a new firm can accept them in one click during onboarding with Use recommended settings.
- Choose a high-contrast or light theme as the firm default if colleagues have asked for easier reading; everyone can still change their own.
- The step order changed when Setup was grouped into sections: Background check is now step 3, Firm profile step 4, Appearance step 5, Modules step 6 and Roles & permissions step 12. Your saved choices weren't affected.
Troubleshooting
Why can't I pay on the Plan & storage step?
Only Business Owners can choose the plan. Admins see the current plan read-only.
The overview says 12 of 13 steps done, but every section looks complete except one.
Look for a dashed circle: usually it's Background check. Also remember that skipped steps don't count in the "done" total at the top, though they do count in each section's counter.
The Finish setting up card is still on my Dashboard.
It disappears when every step is either done or skipped. Open Setup and look for dashed circles.
Opening Setup sends me to a welcome screen.
Your firm is still in its guided onboarding. Click Continue to carry on from where you left off; once onboarding is finished, Setup opens normally.
Was this article helpful?
Share